.avif)

Reading emails every day seems like a chore. What if you can create an automation that summarizes emails you receive in a day? You can save time and stay organized without sifting through countless messages. Imagine starting your day with a concise summary of your inbox, highlighting only the most important information. With the power of automation, this is not only possible but also easier to achieve than you might think. By leveraging tools and technologies like natural language processing and machine learning, you can create a system that filters, categorizes, and summarizes your emails, allowing you to focus on what truly matters.
In this tutorial, we’ll focus on creating an email summary AI agent automation using n8n. An email summary AI agent is an automated system that fetches emails, processes their content using AI, and generates concise summaries. It can also categorize emails, extract actionable tasks, and send updates at scheduled times.
By the end of this tutorial, you’ll learn how to:
- Set Up n8n and email Integration
- Perform email summarization
- Execute delivery of summaries
Tools you’ll need:
- N8n account
- Your email address
Let’s get right into it!
Step 1 - Set Up n8n and email Integration
Go to n8n.com. Create an account or log into an existing one.

After logging in, click ‘Start from scratch.’

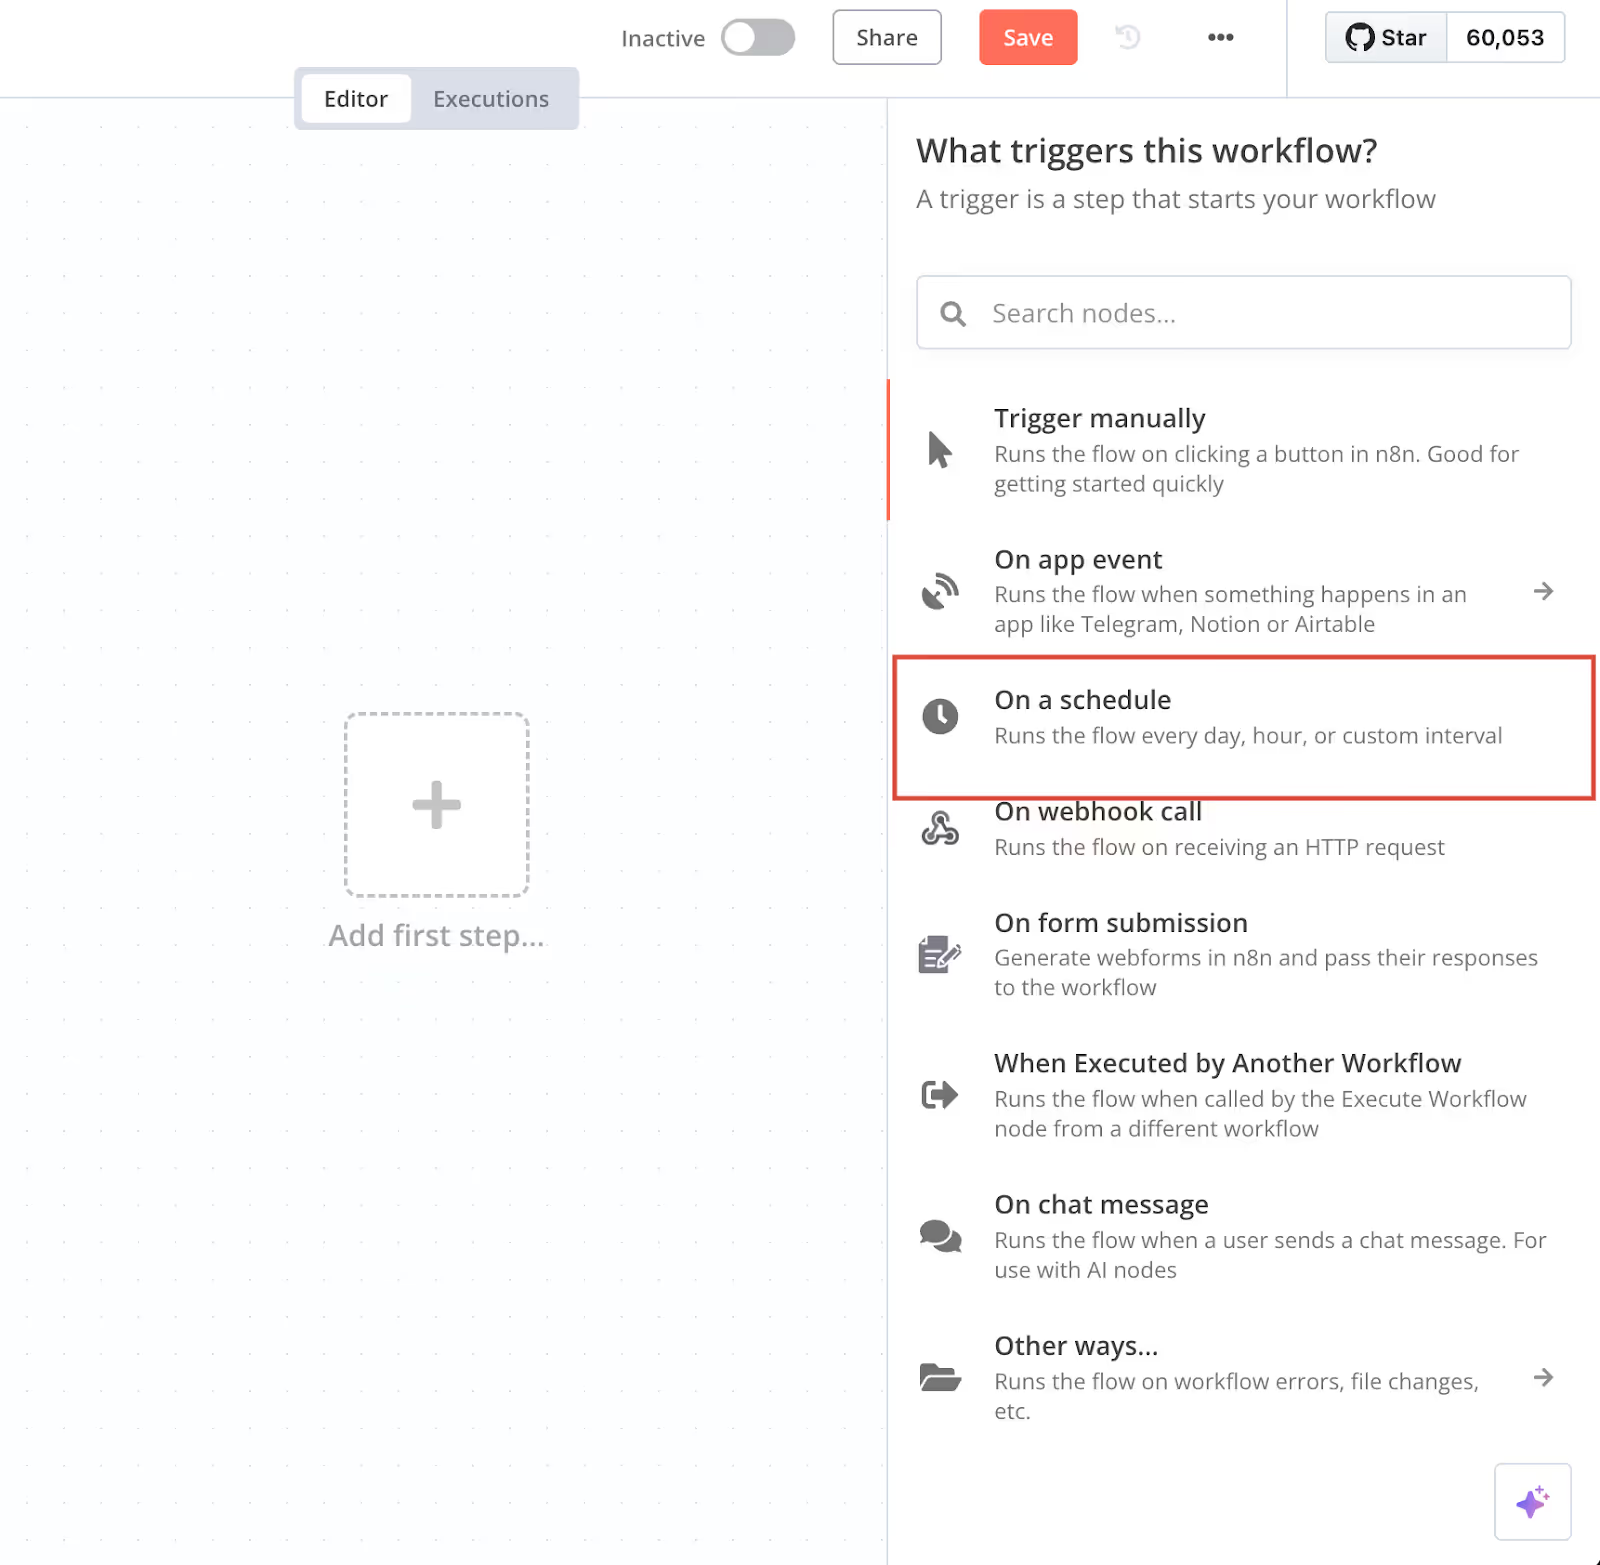
N8n is relatively easy compared to Zapier and make.com. There are quite a few options for triggering the workflow. However, our concern is the ‘On a schedule’ trigger. Our workflow needs a schedule to fetch emails. Click the ‘+’ button in the workflow editor. Select ‘On a schedule.’
Of course, we need to schedule the time for n8n to fetch emails from our inbox. Specify the trigger interval, days between triggers, hours, and minute. Click ‘Test step’ at the top of the popup.

Review the output. Check whether the date and time is correct. Go back to the workflow editor.

Click the ‘+’ button to connect the trigger to your email. In the app panel, search for ‘Gmail’ and click it.

Select ‘Many messages.’ A configurations page will greet you for the Gmail step.

Connect your Gmail account. First, click ‘Create a new Credential.’ Then, click enable ‘OAuth2’ connection and sign in with the Google link.

Select the resource from which you want to fetch data. Specify the limit of the messages it can import and click ‘Test step.’ In this step, you can also add filters, such as attachments, label names and IDs, and status. We will not configure filters since we are just going after the emails in the inbox.

Check the data n8n fetched. Review the emails. Add filters to include specific emails like the labeled ones.

You have now set up n8n and the email integration. Next, we will configure AI-powered email summarization.
Step 2 - AI-powered email summarization
Go back to the workflow editor to converse and configure the email summarization steps. Click the ‘+’ button to add ‘aggregate,’ The aggregate will gather all the data we got from our email account in one place.

Drag the snippet in the Input field name box. This allows the aggregate to gather the data from the email and send it to an AI chatbot to summarize its contents. Click ‘Test step.’

Review the output to see whether the automation engine lists the emails fetched from your account.

Ensure that the aggregate node has successfully gathered the email data. Test the step. It will show you the ‘1 item’ output.

Now, we must set up an AI agent. It will get the emails from the aggregate step and send them to an AI service. The AI will summarize the emails, providing an overview.
Click the ‘+’ sign and search for ‘AI agent.’ This agent will summarize the emails for us.

Add a prompt for the AI agent and define its action. The AI agent gets the data from the snippets generated by the Aggregate node. Use this prompt to help the AI agent summarize the emails. Then, add the snippet from the trigger node.
Prompt:
Go through the email snippets. Identify key details mentioned, any specific issues to examine, action items, and what can be learned.
Snippet: {Add email snippets from the trigger node}
Do not test the step yet.
Go back to the converse and click the ‘+’ to connect an AI model with the AI agent.

Search for the Google Gemini Chat model and connect to your workflow using the API key you get from Google Gemini.

In the connection window, click the credentials drop-down menu. Select ‘Create new credential.’

Go to Google AI Studio. Click the ‘API documentation’ link in the left navbar and get an API key using your Google account.

Paste the key in the Google Gemini model credentials and click ‘Save.’

Click ‘Add Option.’ Select ‘Maximum tokens.’ Set it to 2048. Then, select ‘Sampling temperature,’ ‘Top K,’ ‘Top P,’ and set them accordingly.

Do not test this step right now. Go back to the converse area, right-click the AI-agent node, and open the settings.

Click ‘Test step.’

Review the key details of the summary generated by Google Gemini 2.0. It lists the summary of the emails we configured in the schedule trigger. You can see a list of suggested actions.

Step 3 - Delivery of summaries
In the last step, we will configure our n8n workflow to deliver the summary in the email. Click the ‘+’ sign next to the AI agent and select ‘Gmail’ from the list of triggers.

Select and click ‘Create a draft.’

Configure the Gmail draft settings. Write a subject for the email, drag the output in the message box, and click ‘Test step.’

Go to your Gmail account and click ‘Drafts.’ Click the email summary you received. View the details. Google Gemini has listed the summary with key information, specific issues, action items, and what can be learned accurately.

Once that is done, click ‘Save’ at the top of the canvas once you’re satisfied with the workflow. Click ‘Test workflow’ at the bottom of the canvas. To enable the workflow to deliver summaries to you at the specified schedule, slide the Inactive button to activate the workflow. Now, you will get summaries every day at 10 AM.

That’s it, folks. Remember to experiment with the workflow. You can have it deliver the summaries in Slack or any other application of your choice.
.avif)

.png)
.png)