.avif)

Getting to know your competitor’s marketing strategies and sales is something every online business owner should prioritize, as it helps identify gaps, refine the approach, and create more compelling offers that set your business apart.
Google reviews are one of the easiest and most effective ways to analyze your competitor’s success, especially the marketing strategies. Some businesses hire dedicated teams to snoop on their competitors.
While this tutorial doesn’t claim to replace dedicated professionals, it does a fantastic job of examining your competitor’s online success by analyzing Google reviews. Now, you know that Google reviews can be a telltale sign of how the business is faring.
Instead of time trawling through them manually, you can use AI to quickly create automated summaries of the Google reviews they got for their offerings.
After completing this tutorial, you will be able to:
- Develop a workflow using Airtable and Zapier to streamline the management process.
- Utilize SerpApi to search Google Maps locations and gather their reviews.
- Utilize OpenAI to generate concise summaries of these reviews and integrate them into Airtable.
You’ll need the following tools:
- Airtable account
- Paid Zapier account (you can use their free trial first)
- SerpAPI account
- An OpenAI platform account with $10 worth of credits. This is separate from the ChatGPT subscription.
Let’s get going. Shall we?
Step 1 - Develop a workflow using Airtable and Zapier to streamline the management process
Okay, first, we need to set up Airtable to receive the summaries. However, you can use Notion, too, if you are comfortable with that. It’s perfectly fine to use Google Sheets, too. However, Airtable is streamlined for automation and is easy to use.

Access Airtable and click the ‘Create’ button at the bottom left corner of the page to create a new Airtable from scratch.

Create 5 columns for the review data. At a minimum, you need the following columns:
Keyword - A text field for keywords that we’ll search on Google to find locations
Status - A single select field with one option called ‘Go.’ Switching the record to this status will be used to trigger the automation.
Location Name - A single-line text field for the business location
Location URL - A URL field for the website address based on the location
Review Summary - This is a long text field. We will use Zapier to put the AI review summary here.

For this tutorial, let’s assume you run a motorcycle repair shop in Lyon. So, one of the top keywords to search for can be ‘Motorbike brakes repair in Lyon.’ Add the record in the keyword column.
After finalizing the keyword, click the ‘Grid view’ at the left of the screen under the ‘Views’ tab. Select and right-click the ‘Grid view’ and rename it to ‘All.’

Now, right-click the ‘All’ field you renamed previously and select ‘Duplicate view.’ Rename it to ‘Go.’
Then, apply a filter to only show records where ‘Status’ is ‘Go.’

The Airtable is now set to receive data from Google Maps reviews. To do so, go to Zapier.com and create a new Zap.

Select the first trigger in the zap editor and select/search for the ‘Airtable’ app. Select ‘New Record’ as the trigger event. Then, connect your Airtable account. Click Continue.

Then, populate the fields by selecting the base, table and view you created in Airtable.

Make sure you change the status field to ‘GO’ in the Airtable only once after filling in the keyword column.
It’s time to test the trigger step. You will see the keyword fetched from the Airtable.

Step 2 - Use SerpApi to search Google Maps locations and gather reviews
To find some locations on Google and pull the reviews related to the keyword, we put them in the keyword column in Airtable, click the ‘+’ lobe on the Airtable module, and link a new module.
But first, we need to sign up for SerpAPI. The first 100 searches per month are free, so we are good to go.

Once logged into the SerpAPI account, go to the dashboard page and scroll down at the bottom of the dashboard page to find your API key.

Note: The API key can be misused. Never share your API key with anyone. It will be a long string of numbers and letters. We blurred it for this tutorial.
Since Zapier doesn’t have SerpApi integration, we will use the webhook module to connect to their API.
Click the trigger on the second record and search for ‘Webhooks by Zapier.’
Use ‘GET’ as the action event.

Use the information below to populate the important fields in the ‘GET’ configuration module:
- URL - Use https://serpapi.com/search
- Query String Params: Add the following key+value pairs
api_key = Paste your API key here. You can find it on the SerpAPI dashboard page.
engine = google_maps
type = search
q’= Map the “keyword” value from the trigger step here.

After populating the fields, test this zap step. You will see up to 20 locations returned by SerpApi in the output tab.

As you can see, our data lacks the reviews associated with each location. To access these reviews, we'll need to add another webhook step. However, before we proceed, we must configure Zapier to handle each location separately to obtain its place ID, which is essential for our next steps.
Start by adding a new action step to your Zap. Choose Looping by Zapier as the app and select Create Loop From Line Items as the action event.

In the Values to Loop section, input the following line items:
- placeid - select the ‘local results place ID’ value from the webhook step
- name - map the ‘local results title’ value from the webhook step
- URL - map the ‘local results website’ value from the webhook step.

Click ‘Continue’ to test this zap step. A single location ID, name and URL will be shown. That means success!

Important to consider:
When you test a looping step in Zapier, only the initial set of loop values is available for mapping in the following steps. However, when the Zap runs live, it will iterate over all the values in the loop.
The data we have is incomplete without the place ID. For that, we need to add another webhook step.
Add a new action step. Search for and select ‘Webhooks by Zapier’ and choose ‘GET’ as the action event for this step.

Make sure to populate the following fields correctly in this step.
- URL - Use https://serpapi.com/search
- Query String Params - Add the following key+value pairssome text
- api_key = Paste your API key here. You can find it in the SerpAPi dashboard page.
- engine’ = google_maps
- place_id = Map the “Placeid” value from the looping step here.

Click ‘Continue’ to test this zap step. You will see reviews for the location

That turned out great. We got the reviews for the place. Now we can use OpenAI to create summaries and populate those Airtable fields we created in the first step.
Step 3 - Use OpenAI to generate concise summaries and integrate them into Airtable
If we rely on the reviews only, it will be a lot of data to consume. Why not use OpenAI to summarize these reviews and get a gist of how good or bad the reviews are.
Important to consider: While you might know ChatGPT as OpenAI's standalone chat application, integrating it with Zapier lets you access and use the core APIs and functionalities that drive ChatGPT.
Alright! Let’s get going with the ChatGPT module. Add a new action step to your amazing zap. Select or search for ChatGPT and use ‘Conversation’ for the action event field.

Populate the fields in the ‘Configure’ tab using the following information:
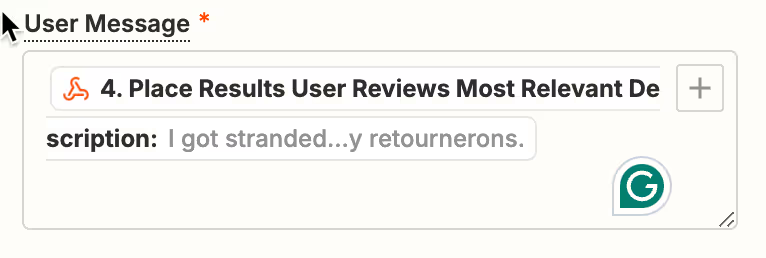
User message:
Map the ‘Reviews Extracted Snipped Original’ value from the second webhook step that you configured before this chatGPT step.
Model:
Select OpenAI’s cheapest and quickest model, GPT-4o-mini

Assistant Instructions:
You can use your own prompt or experiment with various prompts. You can copy the prompt below to test this zap.
Prompt:
Summarize the Google review for the location. If possible, use bullet points to specify highlighted good and bad things along with the summary.

Max Tokens:
This means you have to tell Zapier how many tokens will be required to execute this summarization step. Specify ‘1000’ or more tokens.

Now for the dreadful step - Test. If you have followed all the steps carefully, the test will generate the data in the ‘Data out’ tab. Scroll down to see the ChatGPT response.

The summary looks amazing. Let’s add this to the Airtable we created.
Add a new step. Select/search for ‘Airtable’ as the app and use ‘Update Record’ for the action event.

Choose the same base and table you used in the trigger. For the "Record" field, link it to the 'ID' value from the trigger step.

Now map the following fields accordingly:
Location Name: Map the ‘Name’ value from the looping step.
Location URL: Map the ‘URL’ from the looping step.
Review Summary: Map the ‘Reply’ value from the ChatGPT step.

Test the zap. Go back to the Airtable you created. You will see the data and summary added to the table.

There you have it. You can now add multiple reviews summaries in your table and find what your competitors are doing and how they are faring in your business niche.
.png)
.png)


