.avif)

Building website and app prototypes is serious work that requires dedicated professionals and a lot of money. What if we tell you you can now build websites and apps in seconds? That’s right, with AI, you can now do that in your leisure time and save thousands of dollars and a lot of time.
WebSim AI is a powerful tool for creating websites or app prototypes in seconds. However, it’s much more than a simple webpage builder. It offers advanced features that transform it into a complete application development platform.
This tutorial will explore these capabilities by creating a custom AI image generator site. This will demonstrate how WebSim AI can efficiently handle complex AI integrations, real-time data processing, and user interactions.
By the end of this tutorial, you’ll be able to:
- Design the custom AI image generation app
- Configure image generation options
- Add style customization capabilities
- Ensure stable image generation
Tool you will need:
- A WebSim AI Account (Free plan)
It’s good to know about the tool you will use to create a fully functional application. At least you’ll be able to know which components are taking the brunt of developing the application. These built-in features provide advanced functionality and actual muscle power while allowing us mortals to focus on designing the application.
- Multiplayer sync: WebSim AI lets multiple users collaborate in real-time, keeping everyone in sync with live updates.
- Language model integration allows you to easily integrate language models, enabling dynamic content generation for tools like writing assistants or automation systems.
- Built-in database: You can manage data directly within WebSim AI, avoiding the need for external databases.
- Metadata API: The metadata API provides valuable insights into user behavior and app performance by tracking engagement and other metrics.
- Automatic image generation: WebSim AI automatically creates images when missing or failing to load, ensuring a seamless user experience.
Now that you understand its mechanics let’s move on to building our own AI image generator.
Step 1 - Design the custom AI image generation app
All right, first things first—we must set up WebSim AI correctly to use its advanced features. You’ll also need to turn on a few settings for image generation.
Turn on Advanced Functionality
After signing into your WebSim account, go to your WebSim AI dashboard and start a new project. In the chat interface, click the settings gear icon in the lower-right corner of the sidebar. Then, under "Advanced Settings," toggle on "Automatically generate missing images" to link up with the image generation backend.

Build the hero section.
Let’s start by creating an engaging landing page that introduces users to our new image generator. Use WebSim AI’s styling abilities to create a professional and structured interface.
Prompt:
Create a marvelous hero section for the AI image generator with the headline “Envision. Create. Repeat,” a brief description explaining the free image generation capability, and a ‘Generate’ button. Use a bright theme with Yellow, Green, and Red accents and a dark background. Set up the button to scroll smoothly to the generator section.

Good to know: You can use WebSim AI's free plan for this tutorial. It gives you access to all the image generation features and the Claude Sonnet 3.5 model.
Step 2 - Configure image generation options
Now, let’s build the heart of our app—the image generation interface. WebSim AI has a guide for setting up its Flux Schnell image generation system, which ensures the images are created reliably, and the API connects properly. We’ll follow this guide to set up our image generator. It’s pretty straightforward!
Use the following (big) prompt.
Prompt:
Create an image generation interface with:
1. A style dropdown (options: Artistic, Photorealistic, Abstract)
2. A text input for image description
3. A generate button
Flux Schnell Image Generation Guide for WebSim:
Important Implementation Details:
1. Image Generation Process:
- Initial src will be set to the prompt text
- First src change: URL will update to party.websim.ai API endpoint
- Final src change: URL will update to replicate.delivery endpoint (final generated image)
2. Implementation Requirements:
- Create an image with a unique ID format: flux-image-[timestamp]-[counter]
- Set initial src to prompt text
- Use MutationObserver to track src attribute changes
- Monitor for successful image load after final src change
- Handle loading states with CSS transitions
- Implement retry logic for fetch failures (3 attempts with 3s cooldown)
Example Implementation
const img = document.createElement('img');
const uniqueId = `flux-image-${Date.now()}-${counter}`;
img.id = uniqueId;
img.alt = promptText;
img.src = promptText;
// Track src changes
const observer = new MutationObserver((mutations) => {
mutations.forEach(mutation => {
if (mutation.attributeName === 'src') {
const newSrc = img.src;
log(`Image ${uniqueId} src changed to: ${newSrc}`);
// Final image URL will be from replicate.delivery
if (newSrc.includes('replicate.delivery')) {
// Handle final image state
}
}
});
});
observer.observe(img, {
attributes: true,
attributeFilter: ['src']
});
// Confirm successful load
img.addEventListener('load', () => {
if (img.src.includes('replicate.delivery')) {
log(`Image ${uniqueId} loaded successfully`);
}
});
Debug Notes:
- Watch for two src changes:
1.[party.websim.ai/api/v1/sites/](http://party.websim.ai/api/v1/sites/)... (processing)
2.replicate.delivery/... (final image)
- Final success only when replicating delivery URL loads
- Keep unique IDs to track multiple image generations
- If fetch fails, retry up to 3 times with 3s cooldown between attempts

The implementation creates a powerful image generation system that seamlessly handles everything from user input to the final image delivery. The Flux Schnell system takes care of the complex backend processes, ensuring a smooth and effortless experience for the user.
Step 3 - Add style customization capabilities
What good is an image generation app without granular control options for users? Adding the control options helps users create the exact images they want.
Prompt:
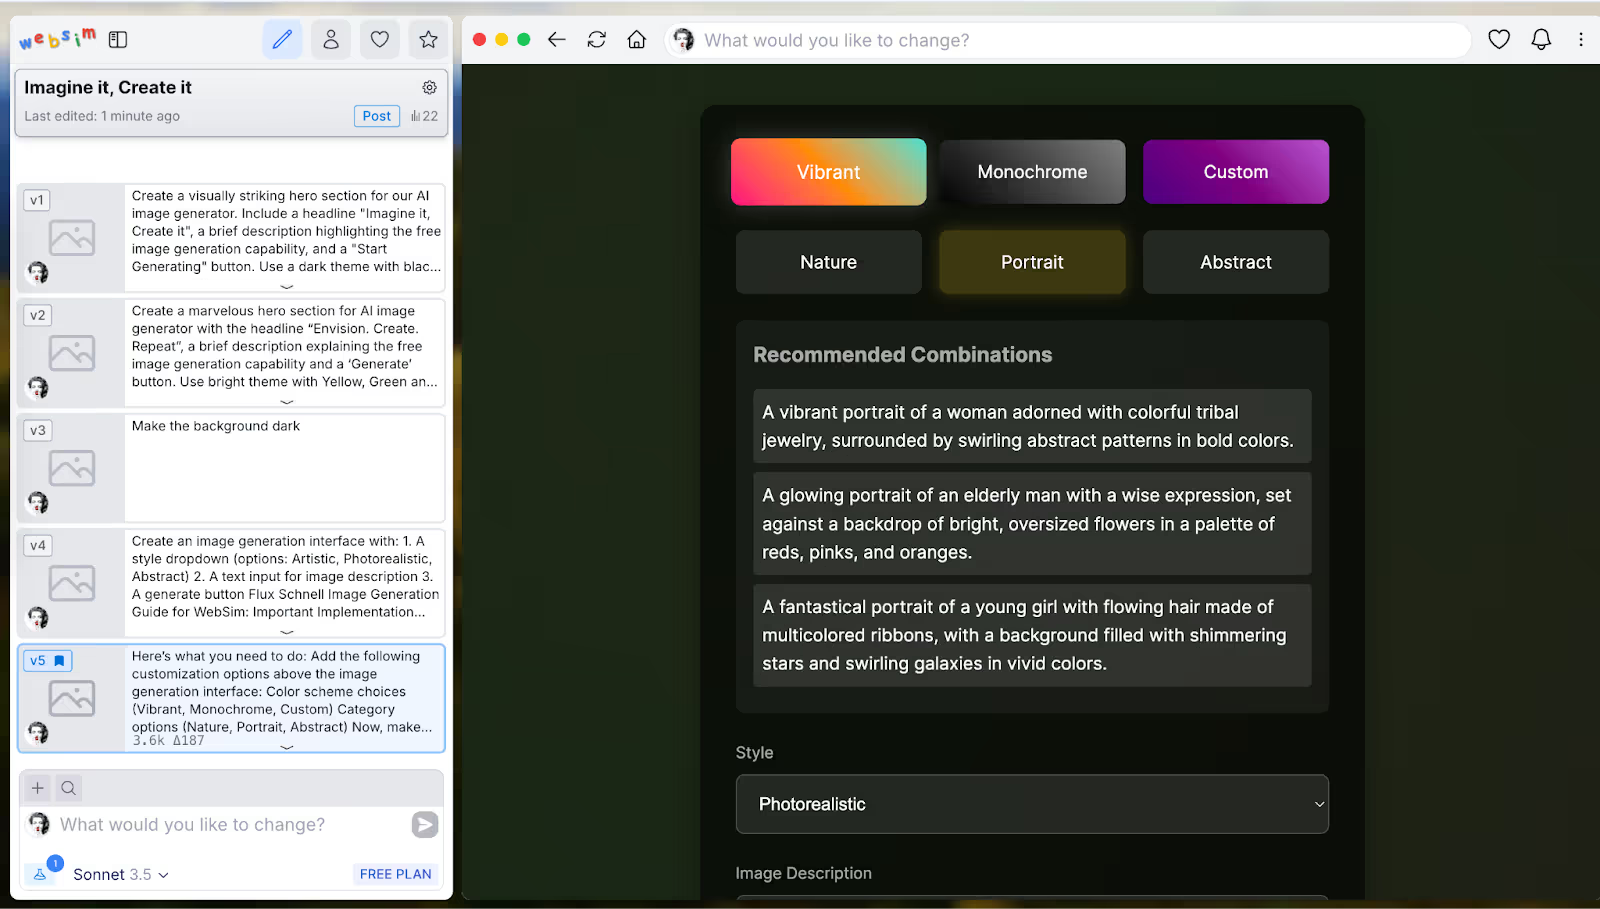
Add the following customization options above the image generation interface:
- Color scheme choices (Vibrant, Monochrome, Custom)
- Category options (Nature, Portrait, Abstract)
Now, make sure each selection is integrated directly into the image generation process by:
- Adding the chosen options to the base prompt
- Updating the visual preview based on the selections
- Displaying recommended combinations for users to select from
It turned out pretty cool. However, I want a color picker panel for the custom color scheme.
Use the following prompt:
Add a custom color picker when the custom color scheme is clicked.

That will do for a while. Let’s test it out.
Testing the AI image generator
Test the setup with a well-designed prompt that will take full advantage of our image generator’s capabilities:
Prompt:
Create a product mockup of modern wireless earbuds with a shiny plastic body and a glowing orange display. Use a clean presentation to place it on a clean white background with subtle reflections, a wide camera angle, and professional lighting.

Step 4 - Ensure stable image generation
You might run into a few hiccups when working with WebSim AI’s advanced features. Here's how to tackle the most common ones:
- If images aren’t generated correctly, double-check that the advanced features are turned on in your settings. Sometimes, just asking WebSim AI to regenerate using the Flux guide can fix the issue.
- For inconsistent results, examine how your prompt is formatted and ensure that the style options are properly connected to the user inputs. WebSim AI can usually fix its own setup if you clearly explain what’s going wrong.
Customization Options
You can level up your image generator by adding some cool customization features. Here’s how:
- To make it fit your brand, tweak the color scheme, add your logo, and include other brand elements in the interface. You can also adjust the style options to match your brand’s vibe.
- To improve functionality, add custom image size presets, save favorites for regular users, or create preset prompts for commonly requested images.
- For a smoother user experience, add a gallery of recent photos, offer prompt suggestions based on user choices, or create custom style combos for specific needs.
And that’s a wrap! We’ve walked through WebSim AI’s advanced features by building a powerful image generator. This project shows how to use API integration, real-time updates, and complex user interactions with WebSim AI.
The methods we covered can be used to build all sorts of AI-powered applications. Whether you're working on collaborative tools, content generators, or interactive web apps, WebSim AI’s features give you a solid foundation to get started.


.png)
.png)
