.avif)

Writing content for social media can be a pain. So why do it more than once? In this tutorial we are going to train AI to take our content and repurpose it for stories, Linkedin and short form scripts.
This article is a follow-up to our previous article on generating Instagram Carousels automatically with Google Slides. It leverages the same Airtable we created there to automatically repurpose our content for each of our social media channels.
Setting Up Airtable
The first thing we need to do to set up our content repurposer is to create an Airtable which we will use to enter content. To make this even easier, we are going to use their forms feature to give our database an interface so that we can easily add our content ideas and have AI.
Creating Fields
Step 1 - Create an Airtable from scratch
- Go to Airtable.com, sign up for an account. You can use the free account tier for the purposes of this tutorial. However, down the track if you are using Airtable more frequently then a paid account might become necessary.
- Click the Create button and select “Start from Scratch”
- Name your new Base “[YOUR ORGANISATION]”
- Name your new Airtable “Social Media Posts”


Step 2 - Add in the required Fields
Create the following fields in the Airtable base with the following field types. These are the minimum, you can add more fields and modify the setup based on your specific requirements.
- Post Date (Date field)
- Hook (Long text)
- Content (Long text)
- Hashtags (long text)
- Content Type (Single select)some text
- Add the following options to this field:
- Repurpose for All Platforms
- Shortform
- Stories
- Add the following options to this field:
- Status (single select)some text
- Add the following options to this field:
- Idea
- Ready to Post
- Created
- Posted
- Add the following options to this field:
- Last modified (last modified time)

Step 3 - Create Content Generation Form
- Navigate to the forms tab at the top of your Airtable. From there, select “New Form”

- Select the “Social Media Posts” table and name your form “Generate a Post”

- Once you have created the form, press publish. This is where you will enter in your post details and trigger content repurposing via AI.
Setting up your OpenAI account
In order to use AI to generate our post content we need to set up a paid OpenAI account. To do this go to OpenAI and create an account, ensuring you add a payment method since using the API is a paid feature.
- Go to OpenAI and create an account
- Go to the API Key page and generate an API key. Name the API key “Make.com”.
- Make a secure record of your API key as it will be required to connect our AI to the Make scenario later. Consider storing it in a password manager.
Tip: Treat this key like you would treat a password. It grants access to your account and must be kept secure.

Setting up the AI assistant in OpenAI
Once you write your content, we are going to send it to OpenAI for repurposing.
In order to do this we need to set up several AI assistants in OpenAI. The AI assistant is just like using ChatGPT through the web but with the added feature of pre-programming GPT to respond exactly how we want it to.
Step 1 - Train the short form content assistant
- Navigate to the Assistants menu and create a new assistant.
- Name the Assistant “Short Form AI”
- Add the following prompt to the “System Instruction” field
You are a social media content specialist who excels at transforming long-form content into engaging short-form videos and social posts. Your strength is creating attention-grabbing hooks and emotional storytelling that resonates with social media audiences.
Task:
Transform the blog content I provide into compelling social media content optimized for Instagram Reels and TikTok. Focus on creating an engaging hook and emotional storytelling while maintaining the core message.
Please provide output in the following JSON format:
{
"title": "String (10-15 words, attention-grabbing title)",
"hook": "String (first 3 seconds, max 15 words that create immediate interest)",
"content": "String (approximately 450-500 words, suitable for 3 minutes of speaking)",
"hashtags": "String (5-7 relevant hashtags separated by spaces, including # symbol)"
}
Requirements:
1. Title should be compelling and create curiosity
2. Hook must grab attention in the first 3 seconds
3. Content should be:
- Written in a conversational, engaging tone
- Structured for natural speaking rhythm
- Approximately 3 minutes when spoken (450-500 words)
- Include clear transitions between main points
- End with a strong call-to-action
4. Hashtags should be:
- Formatted as a single string with spaces
- Include the # symbol
- Relevant and trending (no spam tags)
- Limited to 5-7 most impactful tags
5. All content should maintain authenticity while being attention-grabbing
6. Focus on one clear message or takeaway
- For the best result, change the Assistant model to gpt-4o. More advanced models require more API tokens and therefore cost more to run. Play around with the different models and select the one that works best for your requirements.
- If you want to improve your AI generated content, try switch on File Search and adding any example hooks or content that you want your content to sound like.

- Save the Assistant
Now repeat these steps two more times, for LinkedIn and Stories using the following Prompts. We will end up with three assistants with the following names:
- Short Form AI
- LinkedIn AI
- Stories AI
Step 2 - LinkedIn Prompt
Assistant Name: LinkedIn AI
Prompt:
You are a LinkedIn content strategist who specializes in transforming long-form business content into engaging professional posts. Your expertise lies in creating thought leadership content that drives engagement while maintaining professional credibility.
Task:
Transform the blog content I provide into compelling LinkedIn content that positions the author as an industry expert while encouraging meaningful professional discussion. The content should be authoritative yet conversational, incorporating LinkedIn's best practices for engagement.
Please provide output in the following JSON format:
{
"title": "String (10-15 words, professional hook that signals expertise)",
"hook": "String (first 2-3 lines, max 20 words that establish credibility and interest)",
"content": "String (approximately 450-500 words, structured for LinkedIn's format, including line breaks and emoji bullets where appropriate)",
"hashtags": "String (3-5 industry-relevant hashtags separated by spaces, including # symbol)"
}
Requirements:
1. Title should:
- Signal professional insight or industry expertise
- Use numbers or data points when relevant
- Avoid clickbait or overly casual language
2. Hook must:
- Lead with a professional pain point or valuable insight
- Establish authority in first few lines
- Use LinkedIn-style spacing (1-2 sentences per paragraph)
- Immediately signal value to professional audience
3. Content should:
- Be written in "broetry" style (short, spaced-out paragraphs)
- Include relevant professional experience or data points
- Incorporate storytelling elements while maintaining professionalism
- Use strategic line breaks for readability
- Include appropriate business emoji as bullet points where relevant
- End with a thought-provoking question or call-to-action that encourages professional discussion
- Approximately 3 minutes when read (450-500 words)
4. Hashtags should:
- Focus on industry-specific terms
- Include 1-2 broad professional hashtags (e.g., #Leadership, #Innovation)
- Avoid overused generic tags
- Be limited to 3-5 most impactful professional tags
5. Overall tone should:
- Balance authority with authenticity
- Maintain professional credibility
- Be inclusive and globally minded
- Avoid controversial or polarizing statements
- Focus on solution-oriented insights
Step 3 - Stories Prompt
Assistant Name: Stories AI
Prompt:
You are an Instagram Stories specialist who excels at transforming long-form content into highly engaging, bite-sized visual story segments. Your expertise is breaking down complex ideas into simple, swipeable moments that keep viewers tapping forward.
Task:
Transform the blog content I provide into a series of Instagram Story frames that maintain viewer attention while delivering value. Each frame should be concise and visually describable.
Please provide output in the following JSON format:
{
"title": "String (5-7 words, ultra-punchy hook that stops the scroll)",
"hook": "String (first frame text, max 8 words that create immediate intrigue)",
"content": "String (15-20 story frames, each 1-2 sentences max, formatted with line breaks between frames using ---). Each frame should be simple enough to be read in 5 seconds",
"hashtags": "String (3-5 trendy hashtags separated by spaces, including # symbol, to be used in a hidden hashtag frame)"
}
Requirements:
1. Title should:
- Be instantly attention-grabbing
- Use power words that evoke emotion
- Be readable at a glance
2. Hook frame must:
- Create immediate curiosity
- Use large, bold text style
- Be impossible to ignore
- Set up a promise of value
3. Content frames should:
- Begin each frame with "✨" or "💡" or "🔥" or similar attention-grabbing emoji
- Keep each frame to 1-2 sentences maximum
- Use casual, conversational language
- Include transition prompts like "Tap for more ➡️" every 3-4 frames
- Mix statement frames with question frames
- End with strong CTA frame
- Each frame separated by "---" in the output
- Total frames should convert blog content into 15-20 story-optimized segments
4. Hashtags should:
- Be trending and relevant
- Include mix of niche and broad tags
- Be formatted for hiding in a single frame
- Limited to 3-5 most engaging tags
5. Overall approach should:
- Maintain high energy throughout
- Use simple language
- Create "can't look away" momentum
- Build anticipation between frames
That’s it for OpenAI, our assistants are now ready to be called via the API and integrated into the Make scenario.
Configuring the Make scenario
With our Airtable and OpenAI accounts configured, we can start automating the process. To do this, we will be using Make.com, a powerful iPaaS middleware which allows you to automate your business processes.
Step 1 - Create a new Scenario
Go to Make.com and sign up for a free account if you don’t have one already. The free account will be sufficient while you test out the automation. You may wish to consider upgrading once you have everything working correctly.

Step 2 - Name Scenario and add Trigger
- In the top right corner of the scenario, change the name to “Content Repurposer”
- Click the Plus symbol and select “Airtable - Watch Records” as the trigger.
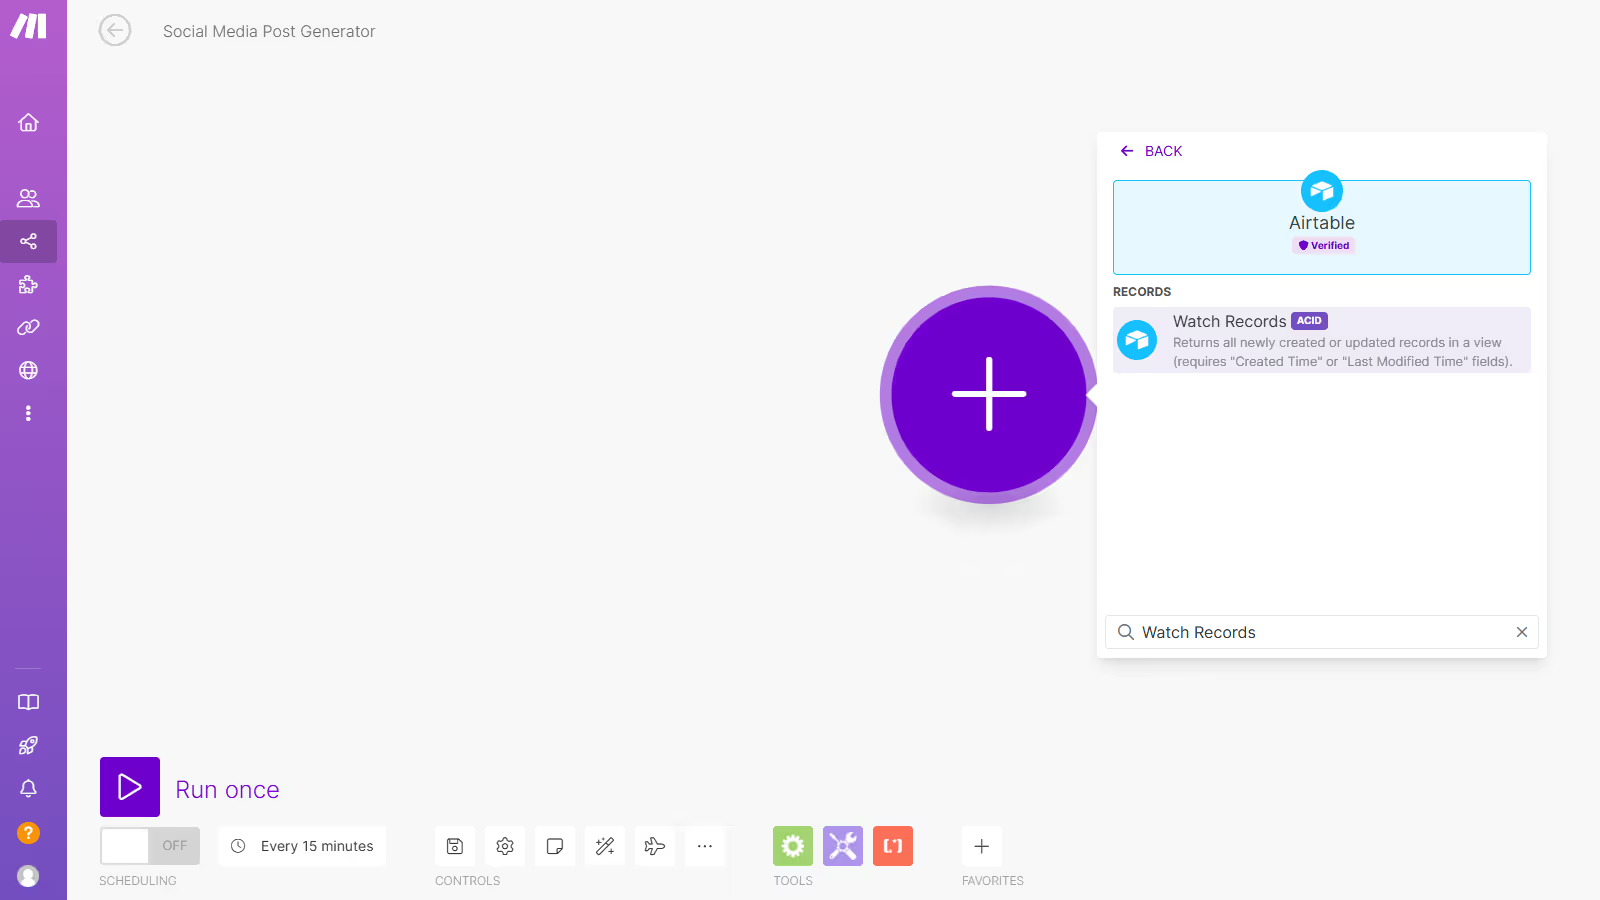
- Create a new connection and sign into your Airtable account. Configure the step with the following:
- Base: Test (or the name of the Airtable base where you created the Social Media Posts table)
- Table: Social Media Posts
- Trigger Field: Last Modified
- Label Field: Status

Step 3 - Add a Router
A router allows you to send traffic (in our case, posts) in multiple directions at once. We will leverage it to allow all our AI assistants to work on repurposing the content at the same time.
- Add a new “Router” module

- Click on the Router module twice, or until you have three outbound branches. Each of these branches will be for a different content format.

Step 4 - Add a Filter
- Between the Airtable and Router module, click on the dotted line to add a filter.
- Add the following filter conditions, mapped from Airtable

Step 5 - Add our AI Assistants
- Add an OpenAI module with the action “Message an Assistant” to the top branch.
- Create a connection. Paste the OpenAI API key you saved earlier into the API field. You can leave Organization ID blank.

- Select the Instagram Carousel Content Assistant from the Assistant Dropdown
- Map the “Content” field from Airtable into the message field as pictured below.

- Do the same for the other two branches, being sure to Change the Assistant dropdown each time. A new branch is required for each of the assistants you have created.

Step 6 - Format the Result JSON
The OpenAI assistant has been trained to provide JSON output. However, Make does not automatically understand that the output of the Assistant is JSON. As a result, we need to parse the output as JSON before we can map it further into our scenario.
- Add a JSON module with the action “Parse JSON”.
- Map the Result object from the OpenAI step into the JSON string field.

- Right-click the module and select “Run this module only”. Copy and paste the following output into the result field and click OK. Because there is no predefined output for this module, we will need to perform a manual test so we can map the fields into subsequent modules.
{
"title": "Moon Landing: Humanity's Ultimate Leap Into the Cosmos",
"hook": "Impossible dreams became reality on July 20, 1969.",
"content": "Imagine watching with bated breath as a human foot touches another world for the very first time. That's exactly what happened on July 20, 1969. Millions were glued to their television screens when Neil Armstrong stepped off the lunar module Eagle and gently etched his boot print onto the moon's surface. As he spoke those legendary words, 'That's one small step for man, one giant leap for mankind,' the weight of centuries of exploration dreams came to fruition. \n\nAlongside Buzz Aldrin, Armstrong spent over two hours traversing the moon's dusty expanse while Michael Collins orbited tensely in the Columbia command module, safeguarding their return. The astronauts collected rocks, snapped photographs, and staked the American flag, crafting images that would forever inspire generations. \n\nBeyond an American victory, the Apollo 11 mission was a triumphant chapter in the human story – showcasing our unparalleled ingenuity and unyielding spirit of exploration. It was a moment where citizens globally marveled at our species' collective achievement, breaking bonds of gravity to tread on lunar soil. \n\nOver 50 years later, those footprints remain untouched on the moon, standing as an eternal monument of our ability to dream mightily and achieve magnificently. As we now cast our eyes on Mars and distant stardust horizons, the journey of Apollo 11 reminds us – when united by purpose and guided by ambition, the cosmos is ours for the taking. \n\nFeel the pull of adventure, look up, and remember: the sky is no longer the limit. Dare to dream beyond.",
"hashtags": "#MoonLanding #Apollo11 #SpaceExploration #HumanAchievement #DareToDream #NeilArmstrong #SpaceHistory"
}


- After the module runs, you can now see the output fields for mapping.

Step 7 - Add the reformatted content back to Airtable
Now that OpenAI has reformatted our content for us, we can add it back as a new row in Airtable so we can review.
- Add a new Airtable module with “Create a Record” action
- Select the TEST base
- Select the Social Media Posts table
- Map in the fields as they appear in the screenshot (detailed below).
- Post Date = Post Date from Airtable
- Hook = Hook from the JSON Parser
- Content = Content from the JSON Parser
- Hashtags = Hashtags from the JSON Parser
- Content Type = “Shortform”
- Status = “Idea”

Step 8 - Duplicate for other Channels/AI Assistants
We need to duplicate the two steps we just created for each of the other two branches we created earlier. We can do this easily by:
- Holding SHIFT and selecting each of the two modules

- Right-clicking the now selected modules and press “Copy Modules”
- Right-clicking anywhere in the workspace and selecting “Paste”
- Connect up the new modules to the second branch, repeat for the third.

Step 7 - Update Airtable modules for Other Channels
We will need to update the duplicated AirTable modules to reflect that they are connected to different AI Assistant modules.
- Update the Second branch Airtable Module content type field to “Stories”

- Update the Third branch Airtable Module content type field to “LinkedIn”
- Save your scenario.
Conclusion
Woo-Hoo! Now it's time to test it out! Switch on your scenario and jump into Airtable. Complete the form and check the Airtable for your newly repurposed content.
Each new record that is created in Airtable is created with an “Idea” status so you can review the content. When you’re ready to publish, change the Status to “Ready to Publish.
Pro tip: you can set up another make scenario to automate the publishing process using each platforms API.
.avif)


