.avif)

One of the most effective online marketing tools is email marketing. It allows the marketer to gather and use email addresses to sell products or services. Gathering leads and turning them into customers is a process that requires email addresses and other contact details. The sign-up page urges visitors to share their email addresses and other information. In return for sharing their email addresses, marketers offer free items or services that might benefit the potential customer. It can be an ebook, a free design evaluation, a webinar, or any other related product/service.
An ebook is one of the most popular ways to give for free as a lead magnet. But writing an ebook and formatting it to a professional level requires time, effort, and money.
AI automation is all about saving time, effort, and money. Creating an ebook and sending it to those who sign up with their email addresses is easy. The setup is not very complex.
We will use a scenario to help you with this tutorial. For this tutorial, we are creating an ebook named The Ultimate Guide to Crafting an Unstoppable On-Page SEO Strategy for Your New Website.
It will have five chapters filled with rare information on optimizing your new website’s SEO without hiring a professional. Each chapter will have a title image and at least a few pages of insider tips describing SEO strategies.
Key Steps
Step 1 - Build a Make scenario
Step 2 - Create a Google Form
Step 3 - Connect ChatGPT
Step 4 - Create an iterator module and add Dall-E
Step 5 - Add an array aggregator
Step 6 - Set a variable to join the data together
Step 7 - Convert the HTML into markdown
Step 8 - Convert the HTML results into a PDF
Step 9 - Configure the email settings to fetch the eBook
Step 1 - Build a Make scenario
For this tutorial, we will use Make for the automation part. You can use Zapier or similar tools; however, Make is easy to understand, and the automation process is rock-solid.
Head to make.com, sign into an account, or sign up for a new one. Access the navigation bar on the left and click Scenario.

Click Create a New Scenario at the top right of the screen.

We will start the automation scenario with a trigger. Trigger is a fancy way of saying workflow.

Before starting an automation scenario, we must create a Google form that can be integrated into a signup page. It can be a newsletter sign-up or any capture form. The form will collect data such as email addresses, first and last names, etc. That data will be the first thing we add to the scenario. Think of it as data input.
When someone enters their information and submits the form, the Make automation will create an ebook using ChatGPT. When ready, the Make scenario will email that ebook, so it’s all automated.
Step 2 - Create a Google Form and connect ChatGPT
Before proceeding with the Make scenario, we must create a Google Form for a signup page. The form should ask the customer the following questions to receive the free ebook.

Make will not register this form until a response is registered with an email address. Click ‘Send,’ go to the URL section, and copy the URL. Paste it into a different browser, fill it out, and submit the form with your email ID.
Access the Make scenario you created in step 1. Select Google Forms, and then click ‘Watch for responses.’

Return to the Google Form and copy the URL in your browser's URL section. Copy the part after /d and before /edit.

Paste the URL part in the Form ID field of the make scenario. We chose the limit to ‘1’ because we do not want Make to record other responses in the test run. Click ‘Ok.’

The next box asks you where to start. Select ‘Choose manually’ and then click the response you submitted from another browser. Click OK to proceed to the next step.

Run this automation step once to see whether all the information is recorded.
The sign-up response will help shape the ebook by giving ChatGPT some information on its type. Connect ChatGPT to the Google Forms automation you just created.
Click the ‘+’ sign next to the Google Forms module and select ChatGPT.
Click Create a Completion (Prompt).
We selected the completion prompt because we want ChatGPT to take the user input and create a general ebook outline. A general outline is necessary because you cannot go to ChatGPT and instruct it to make a 96000 words document in one go. The maximum number of words that can be generated for one prompt is around a thousand to thousand and five hundred words. You need a general outline that follows the natural progression of information in the ebook, and then ChatGPT should be used to generate the ebook based on that outline.

In the connection setting, copy/paste the API key and the organization ID you can generate from your ChatGPT account. You need a paid account to generate an API key. The organization ID is in the settings at the top right corner of the ChatGPT page.

Click Save. Select Create a Chat Completion in the method drop-down. Select a GPT model that will generate the chapters for the ebook. For this tutorial, we are selecting GPT-4o mini because the tokens for the service are cheaper. The mini model is a bit older and a stable version of GPT. Therefore, it is perfect for our ebook.
For the tokens, type 3000. OpenAI charges integrations on a token basis. The higher the version, the more tokens it will charge.

Next, you must tell ChatGPT what to do with the information saved in Google Forms. Click the message and select User.
In the message content, copy/paste the following information:
Book Title:
Book Description:
Tone Of Voice:
Target Audience:
Number Of Chapters:
Reading Level:
The downside of Google Forms is that you must select and add value to each prompt information here. There is no other way around. It is a drill that needs to be done.
For book titles, select the book title, ‘textanswers’ and then choose a value. You have to put in values for each of the categories listed above.

Likewise, select tone of voice for the tone of voice category and target audience for the target audience category. Remember to populate the values for each one. The only good thing about it is that you have to do it once.
Once the values are populated, recheck them to ensure they are correct. If there is any discrepancy, the ebook will be incomplete or have irrelevant information.

Ensure that there is an introduction and a conclusion paragraph. Add another message instructing the ChatGPT assistant to add an introduction and a conclusion paragraph to the chapters it will generate. Follow the steps below:
Click Add a message. select the ‘Assistant’ role and add the following message:
Prompt:
In addition to {{add number of chapters value here }} chapters, please add one chapter for an intro and one chapter for a conclusion.

The third and last message for ChatGPT is to create the output in JSON format. We need GPT to create a JSON file so we can use it for the next step in the automation. If the output is in text, the iterator will have trouble parsing the information.
Click the ‘Show advanced settings’ slider at the bottom of the ChatGPT window.

Here, we need to do two things. First, you have to scroll down to find Response Format. Click the drop-down and select JSON instead of the text.
Next, select ‘yes’ under the parse JSON response heading. This is necessary because Make will instruct ChatGPT to create the output in JSON format.
In addition to this, we need to add a message for the ChatGPT. Head back to the main GPT window and click Add a message. Select the ‘System’ role, and add the following text in the message box.
Use this prompt:
I want the output to be in JSON, separated by chapters. Here's is the exact structure of data I want you to follow, but the amount of chapters could always be different:
{
"title": "{{TITLE_PLACEHOLDER}}",
"description": "{{DESCRIPTION_PLACEHOLDER}}",
"tone_of_voice": "{{TONE_OF_VOICE_PLACEHOLDER}}",
"target_audience": "{{TARGET_AUDIENCE_PLACEHOLDER}}",
"chapters": [
{
"chapter_number": "{{CHAPTER_NUMBER_PLACEHOLDER_1}}",
"chapter_title": "{{CHAPTER_TITLE_PLACEHOLDER_1}}",
"chapter_description": "{{CHAPTER_DESCRIPTION_PLACEHOLDER_1}}"
},
{
"chapter_number": "{{CHAPTER_NUMBER_PLACEHOLDER_2}}",
"chapter_title": "{{CHAPTER_TITLE_PLACEHOLDER_2}}",
"chapter_description": "{{CHAPTER_DESCRIPTION_PLACEHOLDER_2}}"
},
{
"chapter_number": "{{CHAPTER_NUMBER_PLACEHOLDER_3}}",
"chapter_title": "{{CHAPTER_TITLE_PLACEHOLDER_3}}",
"chapter_description": "{{CHAPTER_DESCRIPTION_PLACEHOLDER_3}}"
},
{
"chapter_number": "{{CHAPTER_NUMBER_PLACEHOLDER_4}}",
"chapter_title": "{{CHAPTER_TITLE_PLACEHOLDER_4}}",
"chapter_description": "{{CHAPTER_DESCRIPTION_PLACEHOLDER_4}}"
},
{
"chapter_number": "{{CHAPTER_NUMBER_PLACEHOLDER_5}}",
"chapter_title": "{{CHAPTER_TITLE_PLACEHOLDER_5}}",
"chapter_description": "{{CHAPTER_DESCRIPTION_PLACEHOLDER_5}}"
}
]
}

Run the scenario by clicking Run Once and check whether GPT generates the correct number of chapters.
Click the magnifying glass icon at the top of the GPT module. We can proceed to the next step once you are satisfied with the results.

Step 3 - Create an iterator module and add Dall-E
The Make iterator combines all the chapters in an ebook format. It creates an output in JSON that can be converted into an ebook format.
An ebook has lovely images for each chapter. We will use Open AI’s Dall-E 3 engine to create pictures for each chapter. Of course, all of that will be automated in Make.
Click the ‘+’ button in the ChatGPT module to link the iterator to the ChatGPT module.

Click the green link icon adjacent to the Google Forms.

Drill down to chapters in the array box under the ChatGPT module and select Chapters.
Generate the images for each chapter and the text by clicking the ‘+’ button and selecting ChatGPT as the main module. Click the Images section. You can search for the images in the search box at the bottom of the module window. Click Generate an image.

In the model input box, select the Dall-E 3 model. Write the following prompt, then select the title and chapters from the pop-up selection window. Select the title and the chapter from the flow control module, not the chatGPT module. This will ensure that ChatGPT gives you all the chapters with flow control. Selecting the ChatGPT title and description will provide an image for a single chapter only.
Prompt:
You're creating an image for an E-Book chapter. Here's the chapter you're tasked with creating an image for:
Title: {{chapter_title}}
Description: {{chapter_description}}
After configuring the Dall-E images, we will add a filter between the iterator and the image generator to save some time. We will filter the flow to allow Make to run this part of the scenario once. If we do not put the filter here, it will keep generating all the images for the test run. We will remove this filter once the whole scenario is completed and tested.
Click the wrench icon in between the iterator and the Dall-E 3 module. Type the filter's name and select only 1 chapter for image generation for now. Once everything is completed, we will remove this filter.

A filter icon will appear in place of the wrench icon.
Go back to the Dall-E 3 module and click Advanced settings. Check the size and other details. You can generate a bigger or a smaller image depending on the type of eBook you’re generating.

Generating the text:
Right now, we have the ebook outline with all the information from Google Forms. We configured Dall-E 3 to generate the images for each chapter. Now, we have to create the text for each chapter.
Click the ‘+’ sign and select OpenAI from the list of modules. Select Create a Completion (Prompt) and select the prompt model. It should be the same GPT 4o mini system. Specify the tokens for this prompt. In our instance, we are using 10,000 tokens to ensure that the test runs complete successfully. If you specify fewer tokens, the automation might get stuck in the run and not complete the scenario.

We need 5 messages to ensure that ChatGPT generates the text for the chapters and manages the output in JSON format.
The first message is about the primary prompt for generating chapter text. Choose the user role and paste the following message:
Message 1:
Please write chapter {{3.chapter_number}} of my e-book on {{1.answers.`1ee702f4`.textAnswers.answers[].value}}.
Here's some general rules:
Book Description: {{1.answers.`4f750600`.textAnswers.answers[].value}}
Tone Of Voice: {{1.answers.`52262bfe`.textAnswers.answers[].value}}
Target Audience: {{1.answers.`091ca2bf`.textAnswers.answers[].value}}
Number Of Chapters: {{1.answers.`44404498`.textAnswers.answers[].value}}
Reading Level: {{1.answers.`441b5641`.textAnswers.answers[].value}}
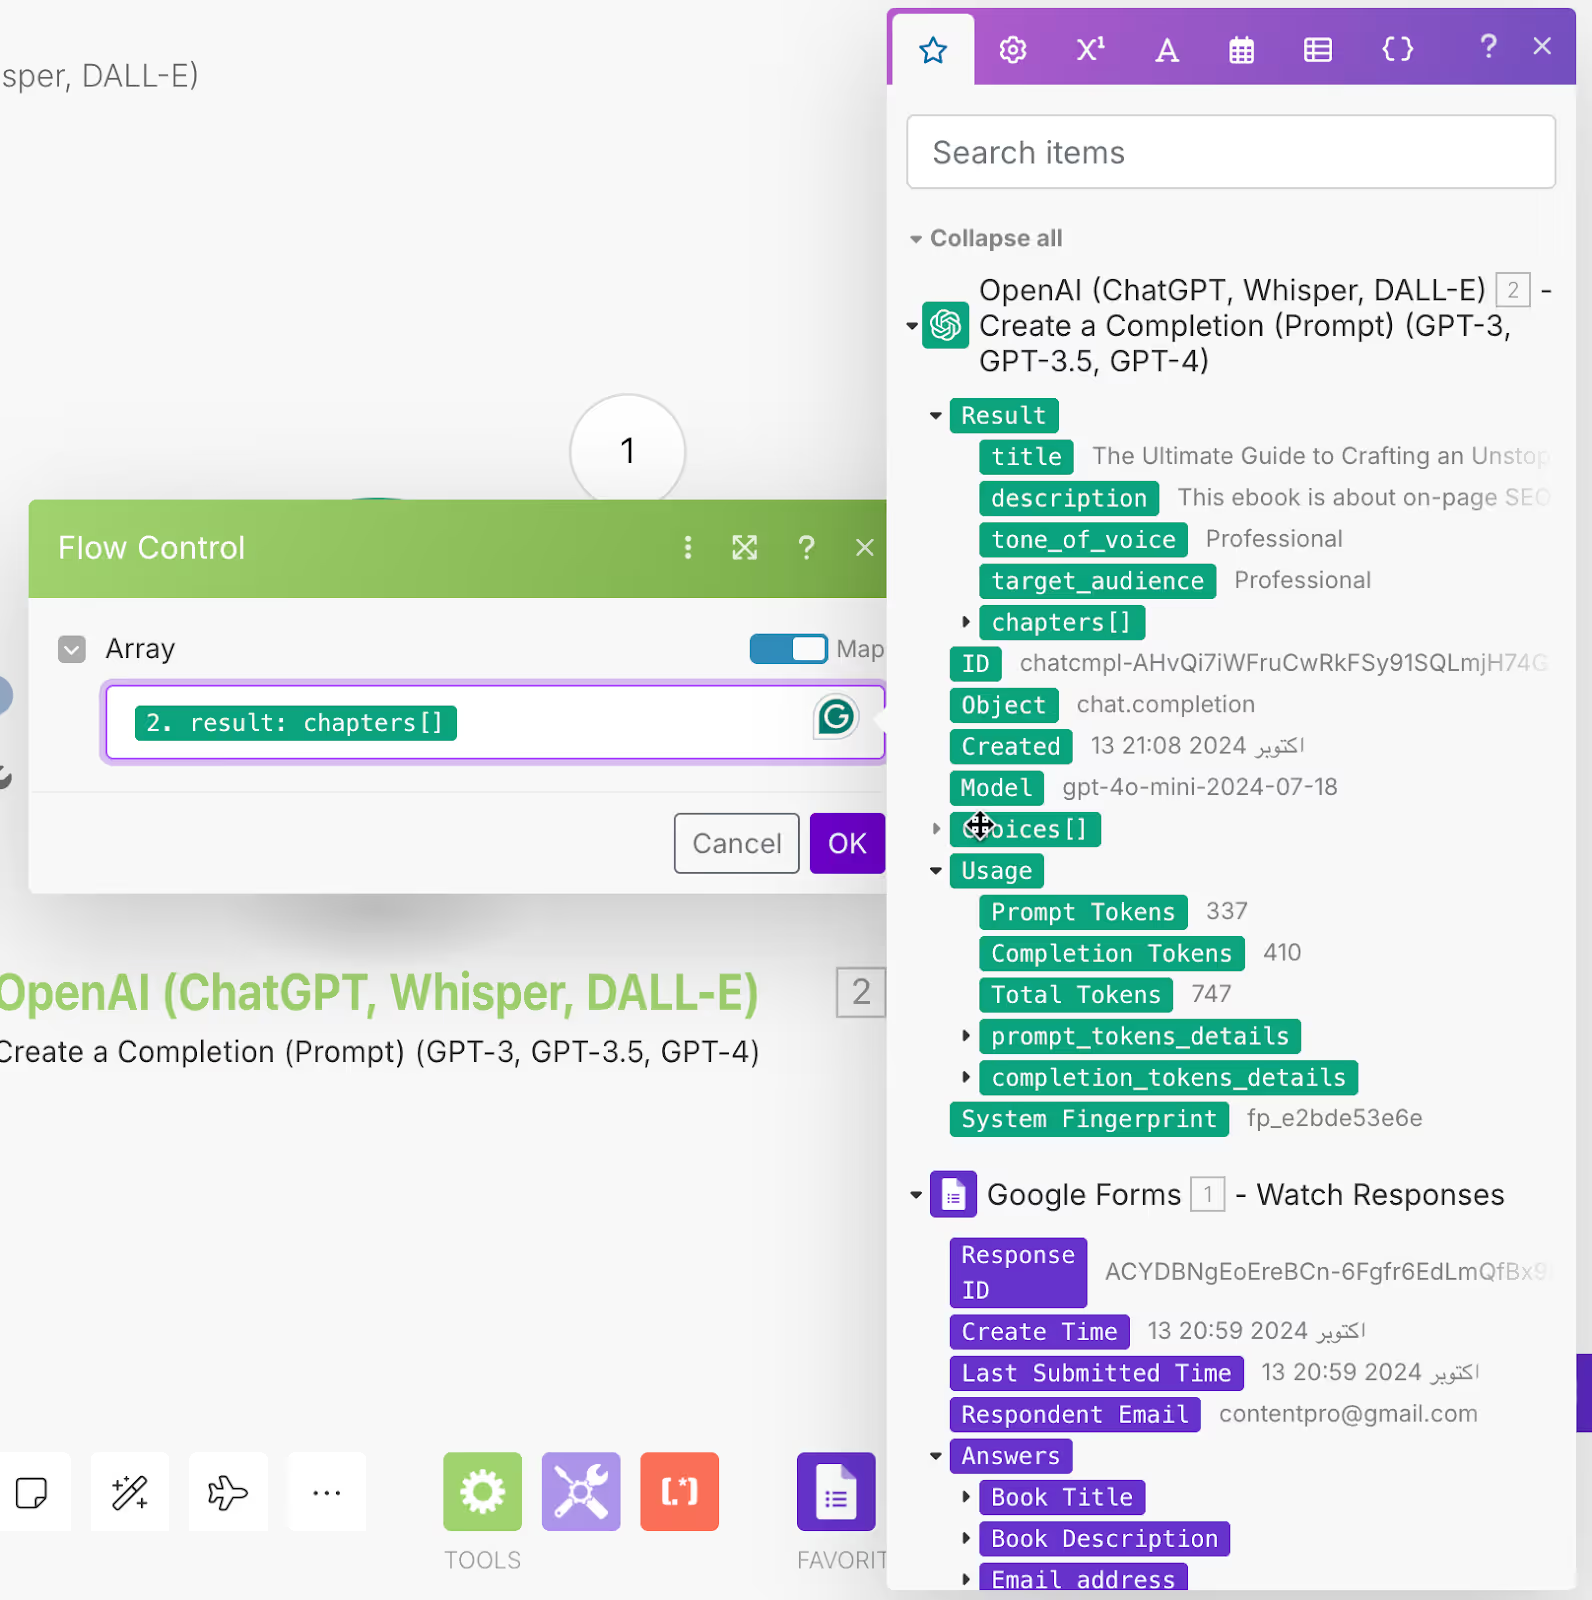
Here's the outline: {{2.result}}
Note: The title value should be selected from Google Forms because the title is a constant value. So we choose it from the source.

Copy the text under general rules from the first ChatGPT prompt you specified. Copy the text from Select This Message. Leave the book title and copy the text from the book description.

Before finalizing this step, you must specify the outline for the ebook. In step 2, select results from the ChatGPT module and click OK.

The next message that goes in this module is the system message. Here, you have to specify that the ebook should be in HTML with the headline tags (H1, H2, etc). This message ensures that the title of the ebook comes before the image and the subsequent headlines come after it. Use the following message to populate the message #2 in this module:
Message 2:
Your response must be in HTML. The primary header for each chapter would be H2, then subsequent headers should be H#
The third message is to tell ChatGPT not to add any commentary or additional text before or after the chapter. This ensures that chatGPT doesn’t use comments like ‘Hey, so here is an interesting chapter that will really give you insider tips for on-page SEO’ or something like that. Choose the system role for this message, too.
Message 3:
Do not include any commentary/additional text before or after the chapter you're creating.
The fourth message instructs ChatGPT to put the image link before the H2 header. The H1 will be the title header, and the H2 headers will appear after the image. Use the role of an assistant for this message.
Message 4:
Below the initial H2, but before anything else, please insert this image link in an img tag with an SRC of {Select URL under the Data from Dall-E 3 module}
In the floating window, click Data under the Dall-E 3 module and select the URL of the image it generated.
The final system announcement tells ChatGPT not to include HTML tags at the beginning of the document. The HTML tags might be printed in the final PDF, which looks terrible. Select the system for the role. Copy the following text for message 5.
Message 5:
Do not include ```html or anything else at the beginning

Step 4 - Add an array aggregator to bind chapters and images together
An array aggregator binds all the chapters and images together to form an ebook in JSON format. This structured format is converted into Markdown, which is then converted into PDF and emailed to the customer.
The iterator goes through each chapter, one by one. The array aggregator binds all that information together to create an ebook.
Click the ‘+’ button and select the array aggregator at the right side of the popup window.

The source for the array aggregator will be the iterator. Select the iterator in the source module. Since we only need the results, we will specify them here. So, in the aggregated field, select results and leave all the other items unchecked. This is an important step. It will not run smoothly if you choose all the items in the aggregated field. It will create an object instead of aggregating the results.

Step 5 - Set a variable to join the data together
To combine everything we did in this tutorial, you must set a variable that joins all the data. It also formats the ebook by instructing Make to put a line between the headings so that the heading doesn’t start from where the last line of the chapter ends.
Click the ‘+’ button and search for ‘set variable.’ Select the variable module and name it ‘Results.’
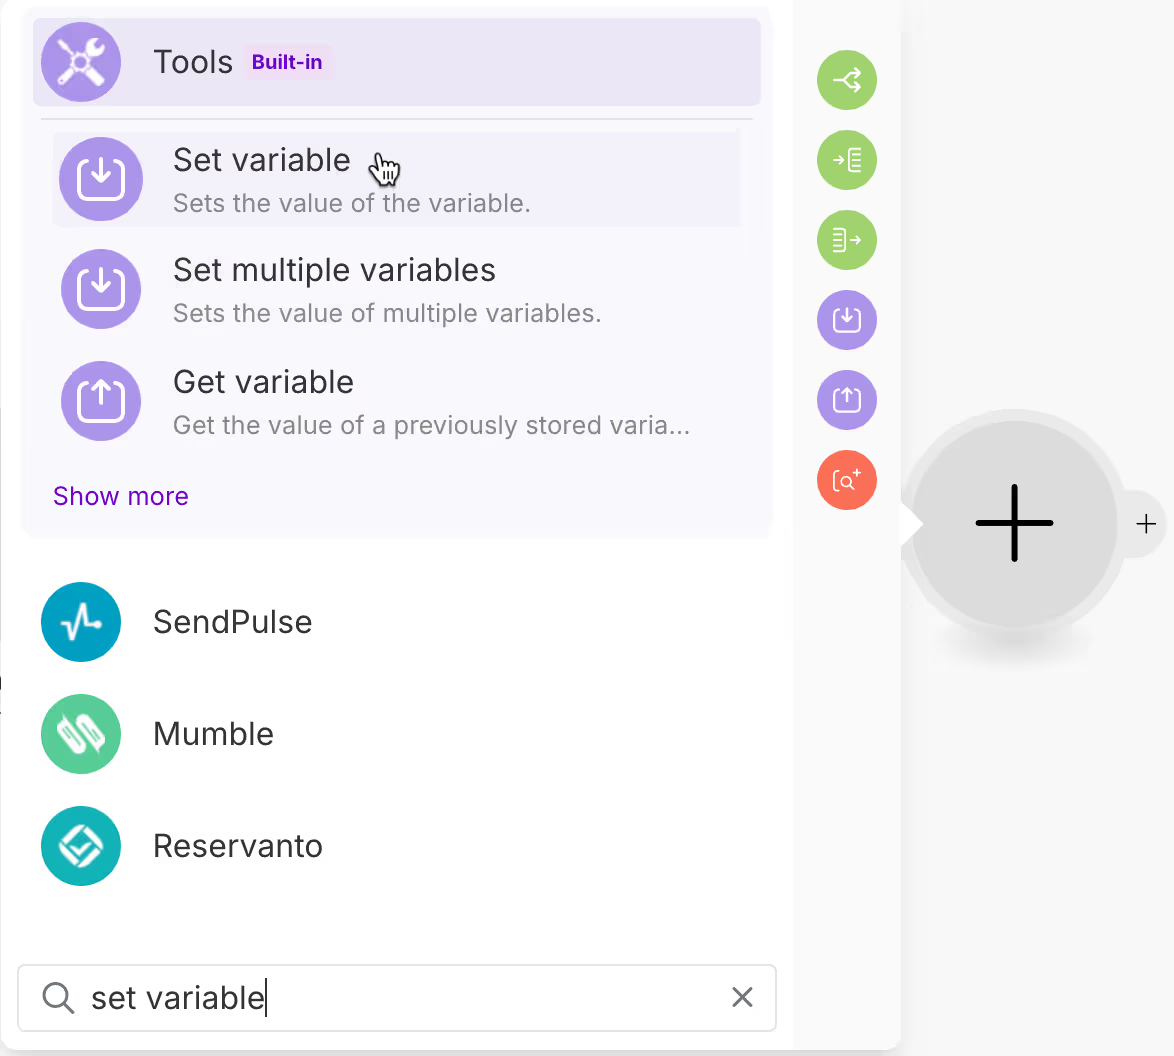
The variables we need here are the join, map, and newline. The join variable creates a string of text for all the chapters in the results module. The map module shows where to find the results module, and the newline variable ensures space between the last line of a chapter and the heading for the next chapter.
Copy the formula below to understand and execute the variables:
{{join(map(6.array; "result"); newline + newline)}}

Select the array module in the array aggregator module. The array aggregator module should generate the results.
Run the scenario to test the modules. To get an ebook, change the filter value you created between the ChatGPT and the iterator to 2.

Once the test run is completed, click the magnifying glass at the top of the tools module (the last one). Here is what your results should look like.

Step 6 - Convert the HTML into markdown
Since our results are in Markdown format, they are unsuitable for PDF conversion. So, we will transform the Markdown we got from the array aggregator into HTML.
Click the ‘+’ next to the variable module and select markdown from the list of modules.

Select the Markdown to HTML module.

First, we must add the title from the Google Forms array to the Markdown input box. Then, we add two line breaks and the results bucket. This will create the final output in HTML format.
NOTE: The line break tags are in the ‘text and binary functions,’ which you can access at the top of the floating array window.

Step 7 - Convert the HTML results into a PDF
After finalizing the Markdown module, we have one last scenario where the converted HTML text and images are transformed into a PDF file.
For this step, you must sign up for the PDF.co service. Go to https://pdf.co and create an account for free. Once the account is active, go to the dashboard and copy the API key generated for you.

Click the ‘+’ sign and select PDF.co from the apps list. Select Convert HTML to PDF and click Create a Connection.

Copy the API key from the PDF.co account and put it in the API key text box.
Configure PDF.co to generate the PDF of the ebook you just created using ChatGPT. Select HTML to PDF in the Convert Type.
Select the HTML generated by the Markdown module for the input HTML code.
Select the eBook title for the output file name. Leave all the other configuration items on default values. Click OK.
Step 9 - Configure the email settings to fetch the eBook
The last step in this scenario is configuring the email module so the customer can receive the ebook via email. Gmail is super slow, so a business email is recommended for this step. I will use the Microsoft account for now.
Once the email connection is established, choose the recipient’s account from the Google Forms list.
Add the subject for the email and the title of the ebook. You can choose the title from the Google Forms data in the floating array window.
Select plaintext for the content type and type the customer's email. You can write anything you like.
The final step is to add the attachment. Choose the generated PDF from the list and add it as an attachment.
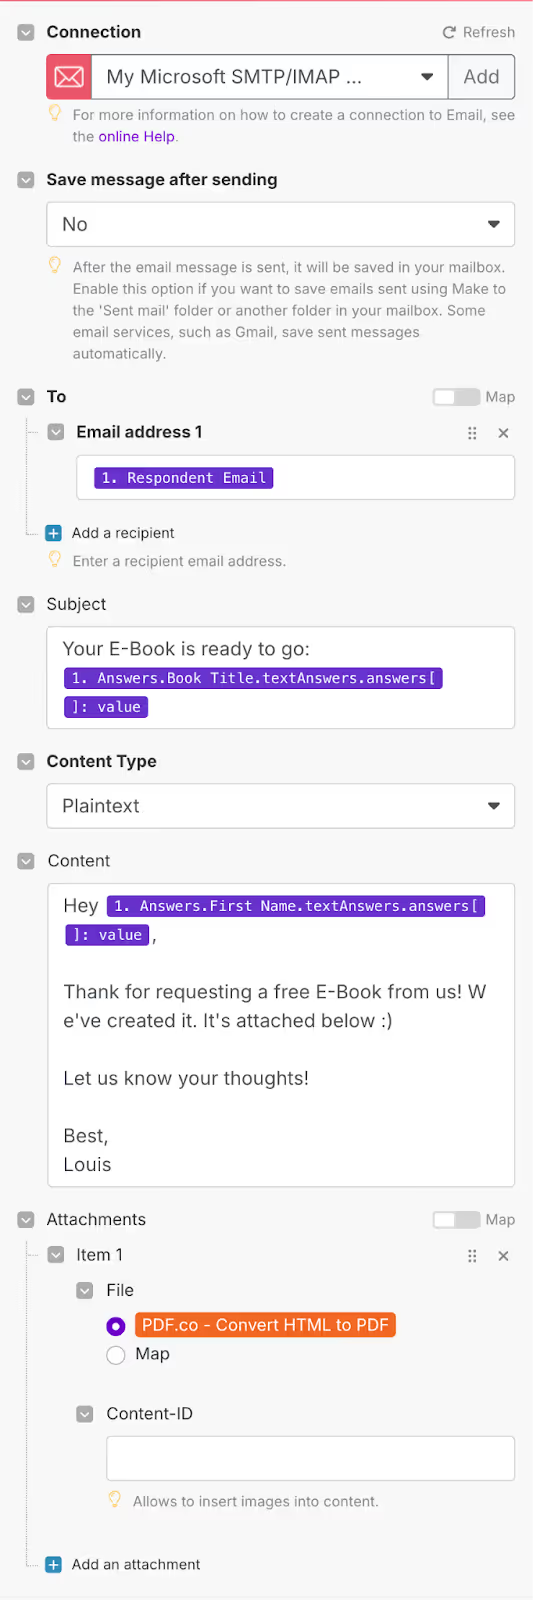
You are good to go. Remember to turn off the filter before running the scenario for the final time.
Here's the PDF we generated. Feel free to modify yours so that it fits your brand and tone!
Written by Ray Rahail Salamat - Technical Writer at Upwork

.png)
.png)
