.avif)
.avif)
In this article, you’ll discover how to create a Telegram chatbot powered by OpenAI’s ChatGPT, all connected through the automation platform Make.com.
By following this easy guide, you’ll set up your own custom Telegram bot, and link it to ChatGPT for smart instant responses on your phone.
This is an ideal beginner project for anyone who wants to bring AI bot(s) into their daily workflows or have a custom AI available on the go, but with minimal technical fuss.
Key objectives
- Set up a Telegram bot using BotFather.
- Connect the bot to OpenAI’s ChatGPT via Make.com.
- Automate responses to Telegram messages with AI.
Step 1 - Telegram bot creation
Your journey begins with creating a free bot on Telegram, starting with BotFather, Telegram’s official bot-making assistant. Open Telegram and search for “BotFather” or head straight to https://t.me/botfather to start a chat.

Once there, click the “Start” button to kick things off.

In the chat, type /newbot to tell BotFather you want to create a new bot.

It will ask you for two things: a display name (like “Captain Hook”) first.

And then a username (like “CaptainHook2025Bot”), which must end with “bot” or “Bot”. Pick something memorable, as this is how users will find your bot.

If you’re ever unsure what to do next, just type /help for a list of commands.
You can also spruce up your bot by adding a start message—what users see when they first interact with it—and an avatar image for a personal touch, though these steps are optional.
When BotFather finishes, it will give you a bot URL (something like https://t.me/YourBotNameBot) and an API token (a long string like 72625304:AAFkj2W9QSqjG0mLU). Write these down carefully—you’ll need them later to connect your bot to Make.com.
For extra details on Telegram bots, check out the official guide at https://core.telegram.org/bots/tutorial.
Step 2 - Create an OpenAI API key
This tutorial demonstrates how to call OpenAI’s GPT-4o—currently among the fastest and most knowledgeable AIs — but the same method also works with GPT-3.5-turbo or any newer OpenAI Chat model.
To use GPT-4o via API, you need a secret API key from OpenAI. Here’s how to obtain one:
Log in to OpenAI: Go to OpenAI’s platform and sign in with your account (create one if you haven’t).
Navigate to API Keys: ① ➡ Click on the settings icon (top-right corner) and then ② ➡ select “API keys” from the left menu. This will take you to the API keys management page.
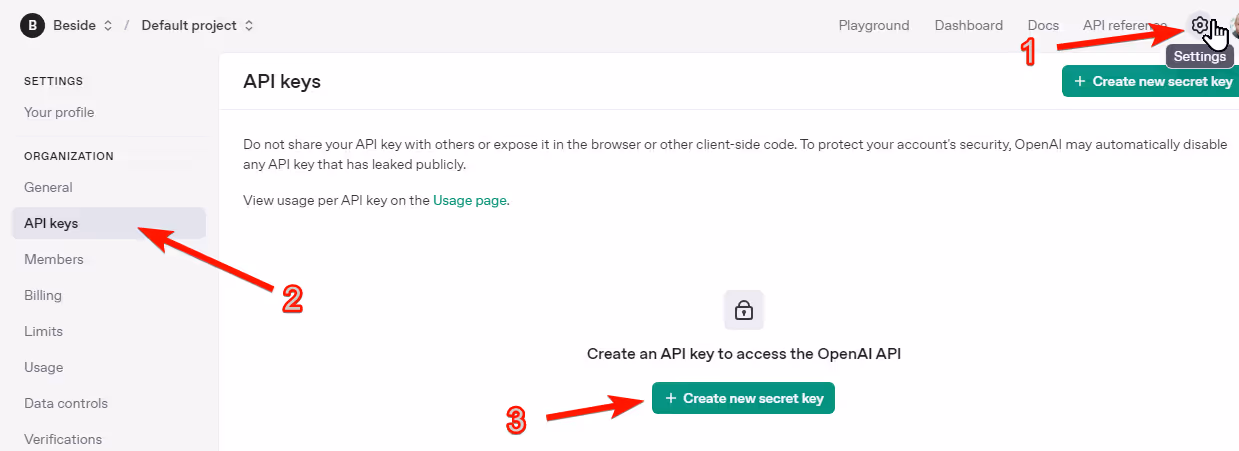
The image above shows the OpenAI dashboard with the setting menu and API keys menu selected to access the “API keys” page.
Create a new key: On the API Keys page, ③ ➡ click the button “Create new secret key”. The below dialog will appear

Enter any name and select the default project. Keep Permissions “All” and click the button “Create secret key” which will bring you to the next screen.

It will show your new API key (a very long string starting with "sk-..."). Copy this key now and save it somewhere secure.
Important: You won’t be able to see it again once you close the dialog!
With your API key in hand, you’re ready for the next step and connect Google Sheets to GPT-4o.
Step 3 - Make.com automation
With your Telegram bot ready and your OpenAI API key in hand, it’s time to tie everything together using Make.com. This platform lets you build workflows—or “scenarios”—that connect apps like Telegram and OpenAI without any coding. The free account will be enough for our needs.
Start by signing up for a free account at Make.com. After logging in, look at the left menu, click “Scenarios”.

Then hit “Build from scratch” (if asked) to create a new workflow.
To begin, click the “+” button to add your first module. Search for “Telegram” to find the node.

Then scroll down and choose “Watch Updates INSTANT”.

This module watches for any new messages sent to your bot and triggers the scenario instantly. Set it up by clicking “Create a Webhook”.

On the next popup click “Create Connection”.

Next, you’ll be asked for the Telegram API token from Step 1.

Save the connection, save the webhook, and lastly save the Telegram node.

Next, add another module by clicking the “+” button again.

Search for “OpenAI” or “ChatGPT” in the bottom bar.

Then select “Create a Completion (Prompt)” from all the options provided.

This is where ChatGPT comes in to generate responses by clicking on “Create a Connection”.

Enter your OpenAI API key from Step 2—no need to add an organization.

Then, pick a model. We’ll go with “GPT-4o,” a fast and clever option that works well for most tasks.

In the “Messages” section, you’ll shape how ChatGPT behaves. Start by setting the role to “Developer/System” and enter a system prompt in the “Text Content” field. Here’s an example:
You are a conversational mediator AI. Your role is to rephrase user messages to ensure they remain neutral, respectful, and free from inflammatory language. Strive to de-escalate potential conflicts and promote understanding between parties by maintaining a calm and impartial tone in all rephrased communications.

A system prompt is like a set of instructions for ChatGPT—it defines its personality and purpose. Without it, the AI might respond in unpredictable ways, so take a moment to craft one that fits your bot’s goal.
Now, click on “Add Message”.

Next set the role to “User”. This tells ChatGPT that the next bit of text is what the user typed. In the “Text Content” field, you’ll connect the message from Telegram.
On the left, you’ll see fields from the Telegram module—find “Message > Text” and drag it into the “Text Content” field on the right.

This links the user’s Telegram message to ChatGPT’s input.
The final piece is sending ChatGPT’s reply back to Telegram. Click the “+” button, and search again for “Telegram”.

Here we pick now “Send a Text Message or a Reply”.

In this module, you need the Chat ID, which identifies the conversation. Drag the “Message > Chat > ID” (don’t confuze it with “Edited Channel Post > Chat > ID”) from the first Telegram module (on the left) into the “Chat ID” field on the right. You have to click on the small triangle beside “Chat” to uncollapse the subitems and see “Chat > ID”.

Then, for the “Text” field, grab ChatGPT’s response. Look in the OpenAI module under “Choices > Text” and drag it into the “Text” field. This ensures the bot sends back whatever ChatGPT generates.

When you’re done, save your scenario.

And the big finale … head back to the “Scenarios” page and flip the toggle to activate it.

If something goes wrong, Make.com’s logging and debugging tools can help you spot the issue—or you can ask ChatGPT for a hand fixing it.
Your bot is now live! Test it by messaging your Telegram bot.
If you set it up as a mediator, try sending something heated—it’ll rephrase it calmly and respectfully.

Inspire your creativity
Your chatbot is up and running, but why stop there? Here are three ways to tweak or expand it:
First, play with the system prompt. Change it to make your bot a translator, a brainstorming partner, or even a trivia expert—whatever suits your needs.
Second, add more modules in Make.com. You could filter messages, save chats to a spreadsheet, or pull in other APIs for extra features.
Third, experiment with the OpenAI’s node. You can use the text field from Telegram as a prompt to generate an image with DALL-E and send the generated image back to Telegram.


The sky is the limit!
Happy hacking!

.png)
