.avif)
.avif)
Welcome to the third tutorial of the Automate Project Management with AI course
So, what we're going to do in this tutorial is boost the power of our project management system in Airtable. We'll use ChatGPT to write some formulas and combine that with Airtable's built-in AI features to enrich our data. On top of that, we're going to create some automated workflows that use AI to update task dates based on certain conditions.
This is all going to take our basic project management system and make it significantly better by automating a lot of those repetitive, time-consuming tasks. We'll upgrade it so it works more for us.
By the end of this tutorial, you’ll be able to:
- Automatically group tasks based on specific criteria.
- Add tags to tasks based on their details.
- Automate timeline updates
Tools:
- Airtable
- ChatGPT
Let’s get right into it!
Automatically group tasks based on specific criteria
If you followed the last tutorial, we created a project management app in Airtable. If you haven’t read it yet, you are advised to follow the steps in the ‘Seamless Project Tracking and Automation’ tutorial before implementing the steps in this tutorial.
Now that our project management app is ready let’s make it even more efficient by adding some automation to handle repetitive tasks and keep things running smoothly. First, we’ll set it up to automatically categorize tasks with upcoming due dates. This will improve our alerts and make communication easier.
First, we must create an Airtable formula to tag records if they are due in the next 7 days.
Prompt:
Create an Airtable formula that calculates to ‘Yes’ if the field ‘Due date’ is within the next 7 days from today and ‘No’ if it is not.

Quick Tip: You can write Airtable formulas on your own or use Airtable's AI tools, but letting ChatGPT handle it is smarter. It’s quicker and more cost-effective, especially since Airtable’s AI features are extra expensive, while regular formula fields are completely free.
ChatGPT will generate the formula for you. You can easily copy it by clicking the “Copy code” button at the top-right corner of the output.

Go to the Airtable Base we set up in the last tutorial, open the “Tasks” table, and click the “+” button in the column header row to add a new column. Then, search for and select the “Formula” field type.

Paste the formula you got from ChatGPT.

Now, your tasks will automatically be categorized based on the Due Date field, which indicates whether they're due within the next week or not.

Quick Tip: We'll explore how to use this field for communication automations in the following tutorial. For now, you can start brainstorming ways to apply this data or create similar formula fields to enhance your task management.
Add tags to tasks based on their details
We’ll use Airtable’s built-in AI fields to automatically tag our data using more complex and ambiguous criteria. To get started, click the “+” button in the column header row and choose the “AI” option from the bottom of the pop-up menu.

Quick Tip: Remember that Airtable’s AI field costs an additional fee on your monthly plan. It’s best to use formula fields whenever they can handle your needs and save AI fields for situations where the criteria are too complex or ambiguous for a formula to manage.
So, now we’ll categorize records. Since most of us do not have a paid option to utilize AI, we will go back to ChatGPT to generate a formula for classifying records based on the assignees for each task.
First, we must create and copy the link to the project management app. Then, we’ll paste it into ChatGPT to see whether it will access the table and see the task and description. It will use the task and description to classify the records based on the assigned teams for each task.
Click the ‘Share and sync’ link in the action bar on the top. Copy the link by clicking ‘Copy link,’

In ChatGPT, use the following prompt to generate a formula for categorizing the records based on task and description.
Prompt:
{Airtable Project Management app link}
Based on the task and description, write a formula for categorizing the records using the provided Airtable link. Categorize each record, specifying which team should head the task. The available teams are research, design, legal, and engineering.

Copy the formula in the new column dropdown.

The formula will calculate the task category based on tasks and descriptions and generate the required data.

Automate timeline updates
In the last step of this tutorial, we’ll set up an automation to update timelines automatically when tasks have overdue due dates. To get started, click on the “Automations” tab in the top menu.

Click the 'Create automation' option in the bottom left corner of the screen.

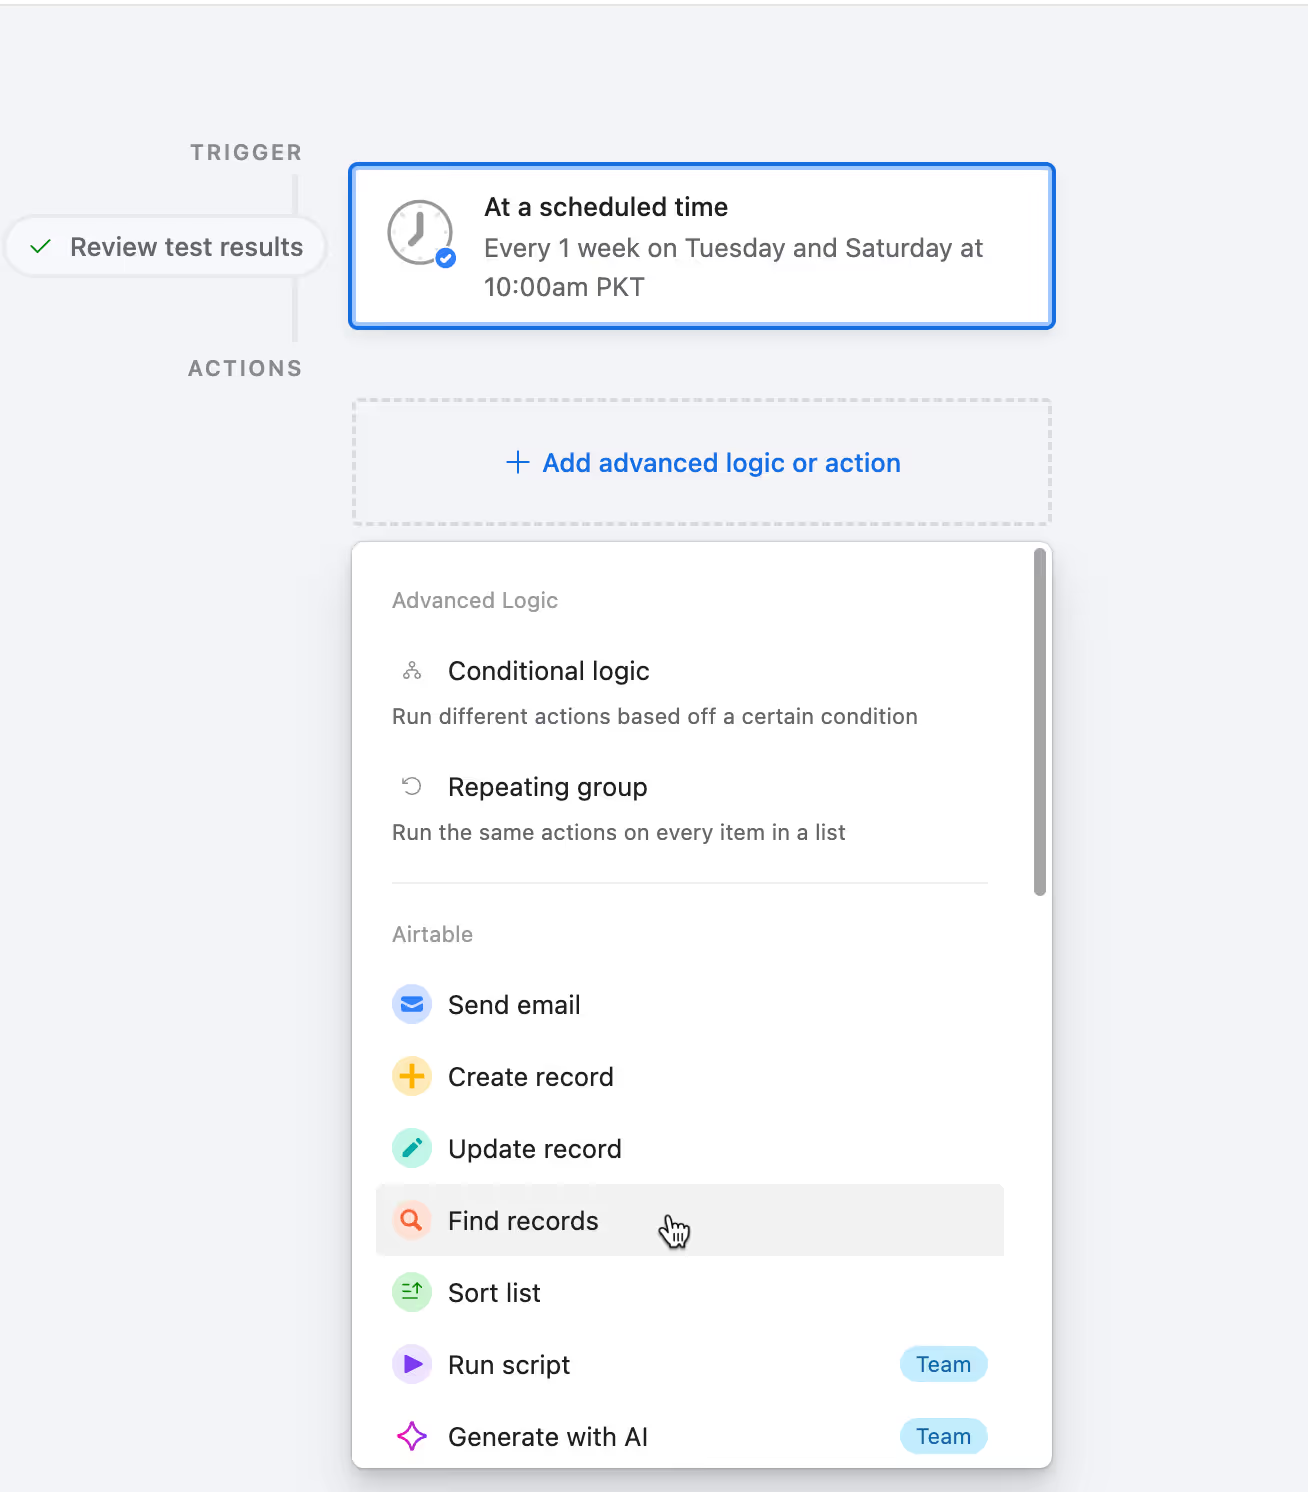
First, we’ll need to set up a trigger for the automation. Just click the '+ Add trigger' button at the top of the page. Since we want the timeline updates to happen weekly, select the 'At scheduled time' option from the dropdown.

In the right navbar, select the frequency of the automation. We’ll configure ours to run weekly on Tuesday mornings.

Next, we’ll locate the records with due dates that are in the past. Click the “Add advanced logic or action” box, then choose the “Find records” option from the dropdown menu.
On the right side of the step editor, set the 'Table' to your Tasks table. Under 'Find records based on…', select 'Condition' and then define your criteria. For this tutorial, the criteria will be records with Due Dates in the past and a Status that isn’t marked as 'Completed.'

Next, add another 'Find records' step to retrieve all the records from your task table. This will give us a broader context for a future AI step and help us determine how to update the Task Due Date by considering all the other tasks within the project.

We can set up a repeating AI step to update the Task Due Date. To do this, click the 'Add advanced logic or action' box and choose the 'Repeating group' option from the dropdown.

Click the 'Select input list' button to set up the input configuration. This will determine the records that the repeating action will process.
Choose the first 'Find records' step and select the 'Use as list' data option. This ensures we loop through all task records with a past Due Date and a Status that isn’t marked as 'Complete.'

The first action of the repeating group allows us to populate data. Choose ‘Generate with AI.’

Now, we’ll set up the AI step with a timeline update directive and additional context from our project. This will help configure each task with a new due date.
Prompt:
This task: [select ‘Task’ from current repeating item] is delayed. Based on the task description, notes, and all of the tasks in the project, output a more realistic task due date. Output just the date, nothing more.Task description: [select ‘Description’ from current repeating item] All project tasks: [select all fields from “Find records from Grid view”]

Finally, add an “Update record” action. Set the field to update as “Due date,” and use the “Response” from the previous AI action step as the input for this field.

Now it’s time to test your new timeline update automation. Find a past record with a Due Date, or update one to meet that condition, and see how the automation works!

Test each step of the automation to ensure it’s working correctly. Check the output from the AI step for the record—it should update the “Due date” to the most reasonable future date within the project timeline.

There you have it! You now have an AI-powered automation system for your Airtable project management base. These building blocks can create additional AI-driven fields and automations tailored to your project needs.
We’ll take it a step further in the following tutorial by automating project communication.


.png)
.png)