.avif)

Spending way too much time creating Instagram carousels in Canva? Not anymore.
This tutorial demonstrates how to build a powerful automated system that transforms simple content ideas into polished Instagram carousels using OpenAI, Make.com and Google Slides.
This solution is perfect for social media managers, content creators, and businesses looking to streamline their content production process while maintaining quality and consistency.
Setting up Airtable
The first thing we need to do to set up our instagram content generator is to create an airtable which we will use to enter and keep track of our posts. To make this even easier, we are going to use their forms feature to give our database an interface so that we can easily add our content ideas and have AI make it happen for us.
Creating Fields
Step 1 - Create an Airtable Base from Scratch
- Go to Airtable.com, sign up for an account. You can use the free account tier for the purposes of this tutorial. However, down the track if you are using Airtable more frequently then a paid account might become necessary.
- Click the Create button and select “Start from Scratch”
- Name your new Base “[YOUR ORGANISATION]”
- Name your new Airtable “Social Media Posts”


Step 2 - Add in the required Fields
Create the following fields in the Airtable base with the following field types. These are the minimum, you can add more fields and modify the setup based on your specific requirements.
- Post Date (Date field)
- Content (Long text)
- Content Type (Single select)
- Add the following options to this field:
- Carousel
- Add the following options to this field:
- Status (single select)
- Add the following options to this field:
- Idea
- Ready to Post
- Created
- Posted
- Add the following options to this field:
- Last modified (last modified time)

Step 3 - Create Content Generation Form
- Navigate to the forms tab at the top of your Airtable. From there, select “New Form”

- Select the “Social Media Posts” table and name your form “Generate a Post”

- Once you have created the form, press publish. This is where you will enter in your post details and trigger the generation of your Instagram Carousels
Setting up Google Slides
Now we have set up Airtable, we can go ahead and create our Google Slides Template for our Instagram carousels. We are going to use dynamic merge fields inside Google Slides to add in our AI-generated content.
Step 1 - Open a New Google Slide presentation.
A Google Slides presentation will be the template for the Instagram Carousels. You can make any design choices here that align with your branding. However, we need to set up a few things to make sure our template works correctly. Name your presentation “instagram_carousel_template”.
Step 2 - Page Layout
Navigate to File -> Page setup and change the page size to custom. Instagram Carousels look best at 1080px x 1350px

Step 3 - Merge Fields
Add the following merge fields and format them as title and body for your slides. Our automation will merge in our content to these fields so make sure the positioning and font sizes align with your design.
- {{page_1_title}}
- {{page_1_body}}

Step 4 - ‘Skip’ the slide
In order for Google Slides to return this slide as a template slide via the API, we need to ‘Skip’ the Slide. You can do this by right clicking the slide in left menu and selecting ‘Skip Slide’.

The slide is correctly Skipped when it looks like this

Setting up your OpenAI account
In order to use AI to generate our post content we need to set up a paid OpenAI account. To do this go to OpenAI and create an account, ensuring you add a payment method since using the API is a paid feature.
- Go to OpenAI and create an account
- Go to the API Key page and generate an API key. Name the API key “Make.com”.
- Make a secure record of your API key as it will be required to connect our AI to the Make scenario later. Consider storing it in a password manager.
Tip: Treat this key like you would treat a password. It grants access to your account and must be kept secure.

Setting up the AI assistant in OpenAI
To consistently generate content in the format required for automation, we need to set up an AI assistant. The AI assistant is just like using ChatGPT through the web but with the added feature of pre-programming GPT to respond exactly how we want it to.
- Navigate to the Assistants menu and create a new assistant.
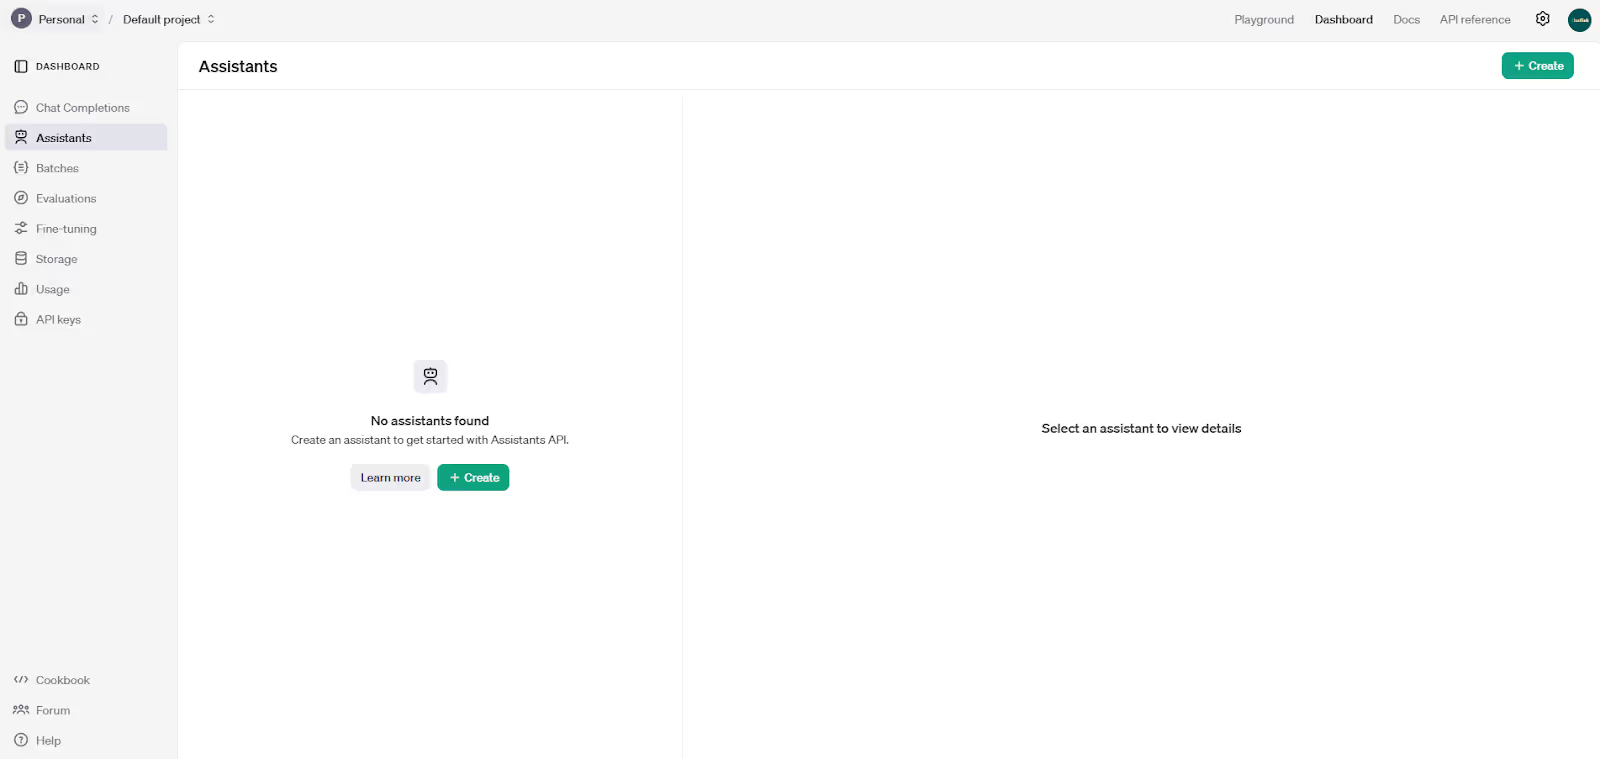
- Name the Assistant “Instagram Carousel Content Assistant”
- Add the following prompt to the “System Instruction” field
Prompt:
You are an Instagram content formatter. Your job is to take content descriptions and transform them into engaging, bite-sized slides suitable for Instagram carousel posts.
When formatting the content:
1. Break down the input content into logical segments that can be easily consumed
2. Create between 1-10 slides based on the content length (do not create more than 10 slides)
3. Each slide should have a catchy, attention-grabbing title
4. The body text should be concise and engaging
5. Keep each slide's body text under 200 characters for readability
6. Ensure the content flows naturally from one slide to the next
7. Include bundle number and total bundles for each slide
8. Format the output as a valid JSON array
Output Format:
[
{
"title": "string", // Engaging, short title for the slide
"body": "string", // Main content of the slide
"bundle": number, // Current slide number (starting from 1)
"total_bundles": number // Total number of slides
},
...
]
Example Input:
"Share interesting facts about coffee's origins: Coffee was discovered in Ethiopia by a goat herder who noticed his goats became energetic after eating certain berries. The first coffee houses appeared in the Middle East in the 15th century and were called 'Schools of the Wise.'"
Example Output:
[
{
"title": "Coffee's Origin Story",
"body": "Coffee was first discovered in Ethiopia by a goat herder who noticed his goats became energetic after eating certain berries!",
"bundle": 1,
"total_bundles": 2
},
{
"title": "First Coffee Houses",
"body": "The first coffee houses appeared in the Middle East in the 15th century and were called 'Schools of the Wise.'",
"bundle": 2,
"total_bundles": 2
}
]
Now, provide your content description and I will format it into Instagram-ready slides following the above format.
- For the best result, change the Assistant model to gpt-4o. More advanced models require more API tokens and therefore cost more to run. Play around with the different models and select the one that works best for your requirements.

- Save the Assistant
That’s it for OpenAI, our assistant is now ready to be called via the API and integrated into the Make scenario.
Setting up PDF.co
Google Slides only allows us to save our completed carousels as PDFs. However, Instagram requires image files (i.e. PNG) for platform content. Luckily we can automate the conversion using PDF.co.
- Go to PDF.co and sign up for a free account. The free account comes with a generous amount of credits for testing however you will need to upgrade to a paid account for ongoing use.
- Go to the Homepage and copy your API key. Make sure to save this somewhere secure like a password manager. This will be required later.

Configuring the Make.com Scenario
With our AirTable, Google Slide template, OpenAI and PDF co accounts configured, we can start automating the process. To do this, we will be using Make.com, a powerful iPaaS middleware which allows you to automate your business processes.
Step 1 - Create a new Scenario
Go to Make.com and sign up for a free account if you don’t have one already. The free account will be sufficient while you test out the automation. You may wish to consider upgrading once you have everything working correctly.

Step 2 - Name Scenario and add Trigger
- In the top right corner of the scenario, change the name to “Instagram Post Generator”
- Click the Plus symbol and select “Airtable - Watch Records” as the trigger.
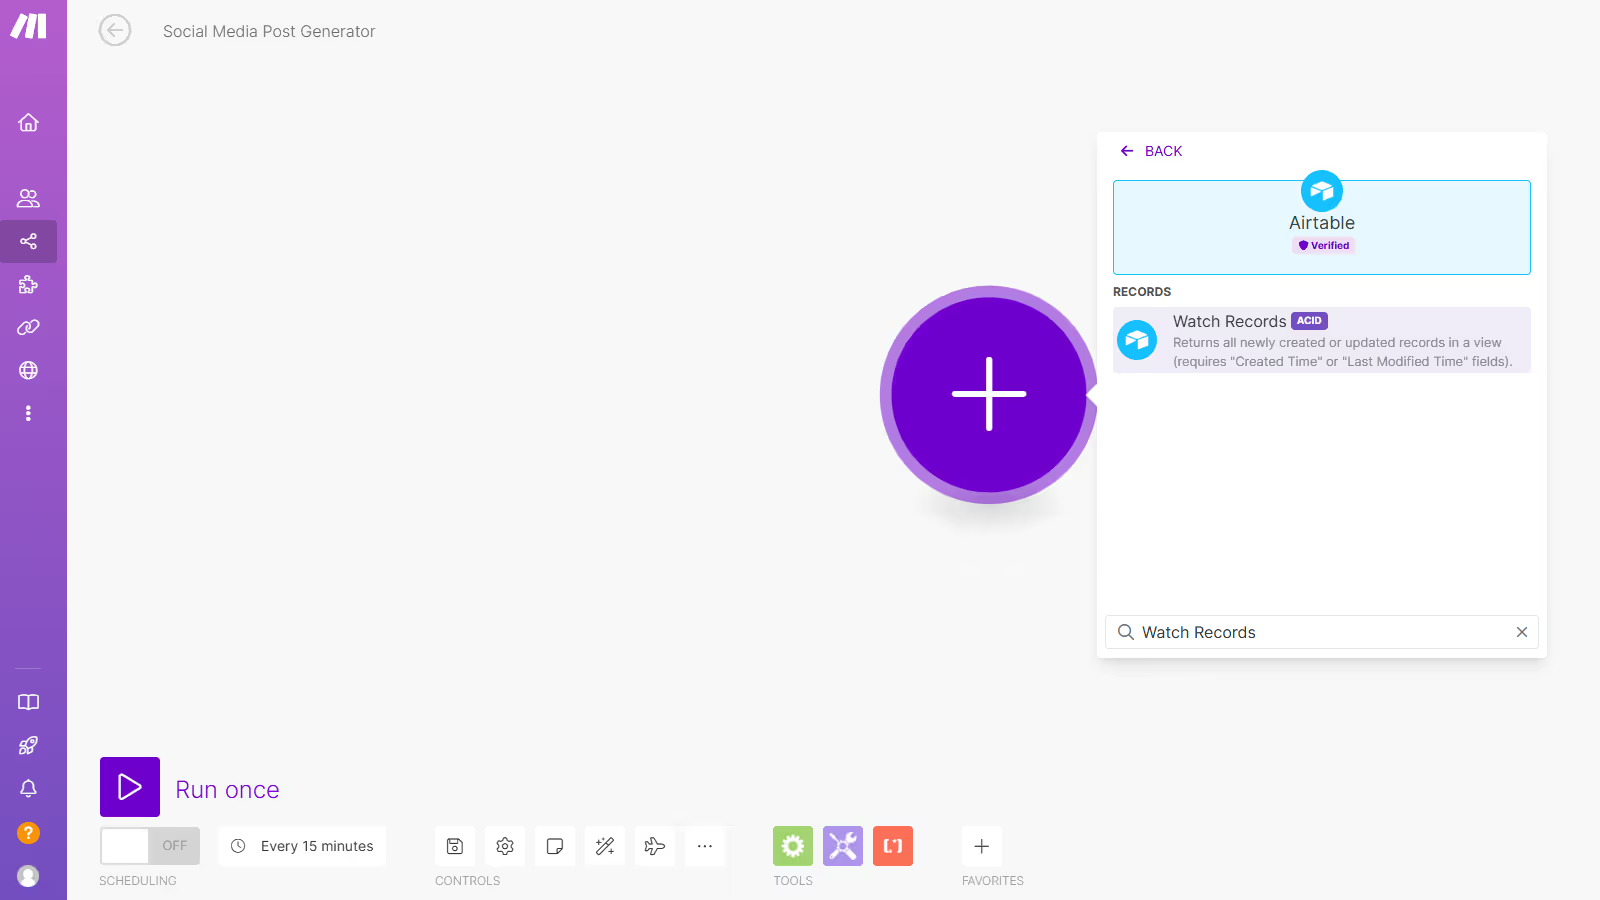
- Create a new connection and sign into your Airtable account. Configure the step with the following:
- Base: Test (or the name of the Airtable base where you created the Social Media Posts table)
- Table: Social Media Posts
- Trigger Field: Last Modified
- Label Field: Post Date

Step 4 - File Storage in Google Drive
When we generate a new post the automation will need somewhere to store the files it creates. We will do this through provisioning a new folder in Google Drive to keep all our files organised.
- Add a Google Drive module and select the “Create a Folder” action. Connect your Google Account if it is not already connected.
- Create your file Schema - for our tutorial example we have created a folder called “Posts” in which we will save a new folder with the timestamp of the post being created.

- Add a filter between the Airtable and Google Drive modules as pictured. This will allow only “Ready to Post” statuses to progress through the automation.

Step 5 - Creating the Carousel from the Template
- Next, add a Google Slides module with the action “Create a Presentation from a Template”. This allows us to create a new presentation every time we generate a post and preserve the original template.
- In the title field, copy the following “{{timestamp}}_instagram_carousel”
- Select the template presentation we created earlier in the Presentation ID field.
- Map the Folder ID variable from the previous Google Drive step into the “New Document’s Location Field”. This will ensure the presentation is created in the correct file location in Google Drive.

Step 6 - Returning required information about the Presentation
- Next, add a Google Slides module with “Get a presentation” action. This will provide us with more detailed information about the Slides presentation we just created.
- Map the Presentation ID from the previous module into the Presentation ID field.

Step 7 - Open AI assistant
- Add an OpenAI module with the action “Message an Assistant”.
- Create a connection. Paste the OpenAI API key you saved earlier into the API field. You can leave Organization ID blank.

- Select the Instagram Carousel Content Assistant from the Assistant Dropdown
- Map the “Content” field from Airtable into the message field as pictured below.

Step 8 - Format the Result JSON
The OpenAI assistant has been trained to provide JSON output. However, Make does not automatically understand that the output of the Assistant is JSON. As a result, we need to parse the output as JSON before we can map it further into our scenario.
- Add a JSON module with the action “Parse JSON”.
- Map the Result object from the OpenAI step into the JSON string field.

- Right-click the module and select “Run this module only”. Copy and paste the following output into the result field and click OK. Because there is no predefined output for this module, we will need to perform a manual test so we can map the fields into subsequent modules.


- After the module runs, you can now see the output fields for mapping.

Step 9 - Create the Carousel Slides
- Next add a Google Slides module with action “Create a Slide from a template”
- In the “Create a Slide from a Template Slide" field, select “By mapping”
- In the “Presentation ID” field, map the presentation ID from “Get a Presentation” module
- For “Template Slide ID (Page Object ID)”, map the Object ID from the same “Get a Presentation” module.
- Under the Values section, make sure Map is switched “OFF”
- Create two tags:
- page_1_title
- page_1_body
- Under each tag, map the Replaced Value from the previous Parse JSON module.
- Page_1_title = title
- Page_1_body = body

The presentation has now been created and all of our AI generated content has been mapped in. The coolest part? It will automatically generate as many slides as it needs to fit the content prompt.
Step 10 - Download the Completed Presentation as a PDF
Next, we need to download the presentation as a PDF so it can be sent to PDF.co to be converted into a PNG file for instagram.
- Add a new Google Drive module with Action “Download a File”
- Enable the “Show Advanced Settings” toggle
- On the “Convert Google Slides Files to Format” dropdown, select PDF.
- Map the Presentation ID from the “Get a Presentation” module.

- Between the Google Slides and Google Drive modules, create a filter by clicking on the three dots between the modules.
- Make the condition of the filter “equal to” and map the “total_bundles” and “bundle” fields from the “Parse JSON” module.

Step 11 - Convert the PDF to PNGs for Instagram
- Add a new PDF.co module with action “Convert from PDF to Images”
- Create a new connection, using the API key you saved earlier from PDF.co
- On the Input File dropdown, select “Upload a File”
- Under File, click Google Drive checkbox
- Under Convert Options, Convert Type, select PDF to PNG
- In the Pages field, write “1-”

Step 12 - Upload the Converted PNGs to the Google Drive folder for the post
Now that PDF.co has converted the PDF presentation into separate images ready for instagram, we need to save them in the right folder so we can find them later.
- Add a Google Drive module with action “Upload a File”
- In the “Enter a Folder ID” dropdown, select “Enter manually”
- Map the Folder ID from the “Create a Folder” module - the second module we created in this tutorial.
- Under File, select PDF.co

Step 13 - Update Airtable
So that we know the Instagram Carousel has been created and the images saved, we need the Airtable record to “Created”. You can also add a notification here via email or Slack.
- Add an Airtable module with action “Update a Record”
- Select the TEST base and Social Media Posts table
- Map the Record ID field from the Record ID in the first module - Watch Records
- In the Status field, type “Created”

- Between the Google Drive and Airtable modules, create an “Equal to” filter by clicking on the connecting dots.
- Map the “Total Number of Bundles” and “Bundle Order Position” fields from the PDF.co module.

Conclusion
Woo-Hoo! Now it's time to test it out! Switch on your scenario and jump into Airtable. Complete the form and check Google Drive for your files ready to post to Instagram.
This automation workflow transforms what would typically be a time consuming process into a streamlined, automated system. By combining the organisational power of Airtable, the creative capabilities of OpenAI, we have created a robust content generation pipeline that saves time and maintains consistency in your social media presence.
.avif)


.png)
