.avif)
Apify is a versatile platform designed to simplify web scraping with user-friendly tools and seamless integrations. By pairing it with AI analysis, you can automate a wide range of tasks to boost your business efficiency.
This tutorial will walk you through creating an automation that monitors your Amazon product reviews. Once set up, you'll input your product URLs, and the system will automatically gather new reviews and deliver detailed analysis reports on your preferred schedule.
Although we’re focusing on the Amazon Reviews Scraper in this tutorial, the same approach can be applied to any of Apify’s tools, making it easy to adapt this workflow for other platforms.
By the end of this tutorial, you’ll learn how to:
- Configure Apify's Amazon Reviews Scraper
- Create an automated workflow using make.com
- Process review data
- Generate insightful reports using Claude
- Deliver automated analysis to Google Sheets
Tools you’ll need for this workflow:
- An Apify account (offers $5 credit initially)
- A make.com account
- Anthropic API key
Let’s get right into it!
Step 1 - Configure Apify's Amazon Reviews Scraper
Apify features a store where you search and select actors. An Apify actor is a script or program that runs on the Apify platform to perform specific web scraping, automation, or data processing tasks. Apify provides a cloud-based environment for running these actors, enabling users to extract, process, and manage data from websites at scale.
Go to apify.com and log into an account. You can get a free account with $5 credit.

After logging in, you’ll be directed to the Apify store. Search for Amazon reviews scraper and click the first item on the results page.

Configure the actor to access the Amazon product page and scrap the reviews. Start with the URL of the Amazon product page. Choose a product page from which you want to scrape reviews and paste it into the ‘URL of Amazon products.’ You can specify multiple pages or upload a text file with Amazon product URLs.
Next, specify the number of reviews you want to extract. You can select up to 500 reviews per product. Now, determine the review type. You can select either the most recent or top reviews. Subsequently, specify the filter by ratings, keywords, and date. These settings ensure you get the exact data you want to scrape. In the ‘Other settings’ module, choose a preferred language in which you want the reviews to be listed and proxy country. After configuring the scraper, click ‘Save.’

Start the scraper by clicking the ‘Start’ button.

Once the actor finishes scraping the page, click ‘Export 5 results.’

Specify the format for viewing the data. Select ‘HTML Table’ and click ‘Preview’. Alternatively, you an also ‘View in new tab.’

The entire dataset has been scraped successfully.

Step 2 - Create an automated workflow using Make.com
Of course, we need to make sense of the data pulled from an Amazon product page. Let’s automate the entire process to get consistent data flow for the analysis.
Go to make.com and click ‘Create New Scenario.’

In the first module, search/select Apify. Choose ‘Run an actor’ in the Apify module.

First, we need to set up a connection. For that, we need an API token.

Return to the Apify dashboard and click ‘Settings’ in the left navbar.

Go to the ‘API & Integrations’ tab and copy the default API token when signing up.

Paste the API token in make.com’s Apify connection settings. Click ‘Save.’

Configure the Apify module to get the reviews we scraped from an Amazon product page. Select the Amazon reviews scraper actor and select ‘Yes’ to run the instance synchronously.

Next, we must obtain the JSON code from the Amazon Reviews scraper actor. To do so, go back to the Apify dashboard and click ‘Actor’ at the top of the page.

Access the JSON tab in the input window and copy the code.

We must sanitize the JSON code to ensure that make.com can read and execute it. Go to jsonformatter, paste the code in the code box, and click ‘Process.’

Click the copy button at the top of the processed code box.

Paste it into make.com’s Apify module settings window.

Leave the rest of the settings on default. Click ‘OK.’
Next, add another Apify module. Click the ‘+’ button next to the Apify module you configured. Search/select Apify and choose the ‘Get dataset items’ submodule.

Specify the Dataset ID by selecting ‘defaultDatasetId’ from the list of items generated by the previous Apify module. Set the limit to 5 because Apify generated 5 reviews in the first step. Click ‘OK.’

Step 3 - Process review data
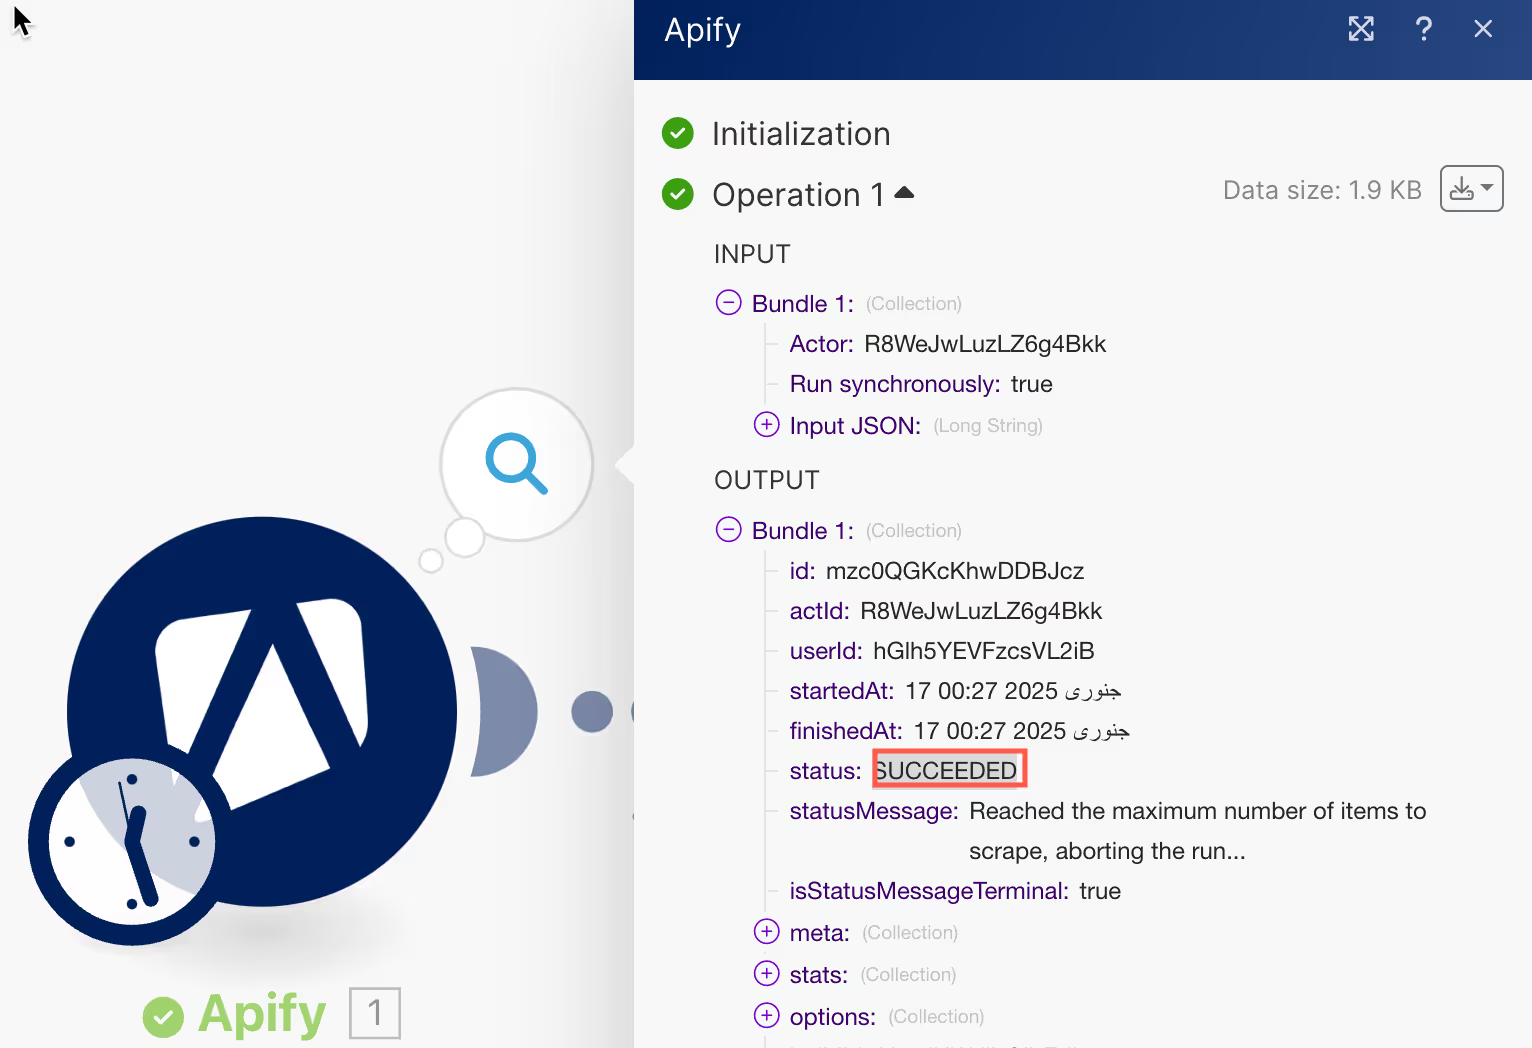
Let’s test the scenario we created before proceeding to the next steps. Click ‘Run Once’. Make.com will get the data from Apify’s results. The status shows that it succeeded. Click the magnifier icon at the top of the module to view the results.
The next Apify module shows product reviews, rating scores, positions, and variant types.

Now, we can use this data to generate insightful reports using the Claude module in Make.com
Step 4 - Generate insightful reports using Claude
Analyze the data and highlight patterns, trends, and sentiments. Claude can help us break down the reviews into meaningful insights, such as identifying what customers love, what needs improvement, and how we can tailor our approach to better meet their needs. Consolidating everything into a clear, concise report will give us a solid foundation for making data-driven decisions and improving the product experience.
So, let’s integrate Claude into our make scenario by clicking the ‘+’ button next to the last Apify module. Search/select Anthropic’s Claude, choose ‘Create a prompt,’ get an API token, and paste it into your Claude module to establish a connection.

In the Claude module configuration, select the maximum tokens for the report. We specified 800 tokens to be on the safe side. Click ‘Message’ and ‘Role.’ Choose the user role and content type ‘Text.’ Use the following prompt to generate a consolidated report of all 5 top reviews from Apify.
Prompt:
Please analyze {{2.reviewTitle}}{{2.reviewDescription}}{{2.variant}}{{2.ratingScore}} product reviews and create a report. Summarize the key trends, positive highlights, and areas for improvement. Provide actionable insights for better customer satisfaction.

Run the scenario once. Claude will generate a report for each review. You can view the output by clicking the magnifying icon at the top of the module.

Step 5 - Deliver automated analysis to Google Sheets
Let’s put all the analysis in a Google Sheet. You can also send it as an email notification to your email account. Create a blank Google sheet and name it ‘Scraping sheet.’ Add headers for the data so it can be segregated accordingly.

Return to the Make.com scenario and click the ‘+’ button next to the Claude module. Select Google Sheets in the module search box. Choose the ‘Add a row’ sub-module.

In the ‘Spreadsheet ID,’ specify the Google spreadsheet name you created and choose the sheet. Map the values to Claude’s output data.
Run the scenario. Make.com sends Claude’s analysis to your Google sheet.

There you have it. You can also send Claude’s analysis via email. It depends on your workflow. If you want stakeholders to use Google Sheets to view data, you can send an email notification and a link to the Google Sheets by adding an email module next to the Google Sheets module. There are many scenarios you can create to automate the whole process. Once everything is in place, you can get automated reports of Amazon product reviews.
.avif)

.png)


