.avif)
.avif)
This tutorial teaches how to automate invoice processing by extracting data from PDFs uploaded to Google Drive.
It uses n8n, a workflow automation tool, and Mistral OCR API, an AI-powered text extraction service, to pull invoice details, match fields, convert currencies to USD if needed, and log everything into a Google Sheet.
Professionals can save hours on repetitive financial tasks with this practical setup.
Key objectives
- Set up n8n to trigger when new invoice PDFs are uploaded to a Google Drive folder.
- Extract text from PDFs using Mistral’s OCR API.
- Convert non-USD amounts to USD.
- Append the invoice data to a Google Sheet automatically.
Step 1 - Create a Google Drive folder and a Sheet for invoices
Start by setting up a new Google Sheet to store the invoice data. Create a new Google Sheet and add these columns:
- Invoice Number
- URL to Invoice
- Date
- Vendor
- Line Items
- Original Currency
- Amount (Original)
- Amount (USD)
- Description
- Notes

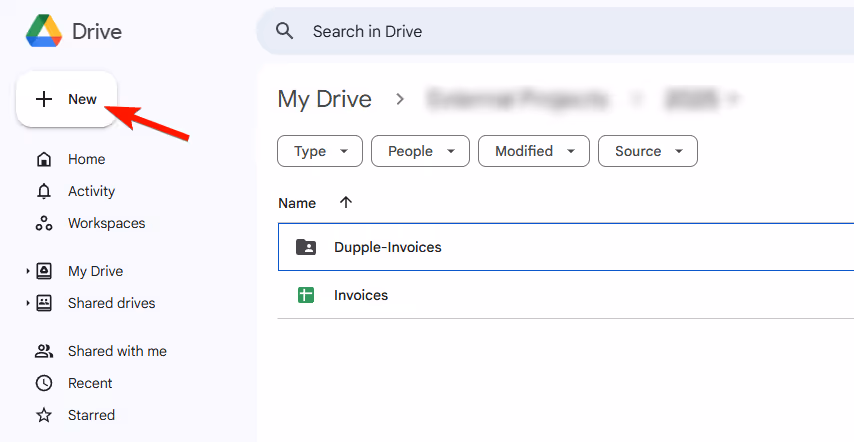
Next, we need a dedicated space in Google Drive for your invoice PDFs. Click "New" and select "Folder". Name it something clear, like "My Invoices 2025". After creating it, open the folder and look at the URL in your browser. The folder ID is the string after "folders/"—for example, in "https://drive.google.com/drive/folders/abcd12343", "abcd1234" is the ID. Copy this ID, as you'll need it later to tell n8n which folder to watch.
Check whether you have permission to access this folder, and keep it exclusive to invoices to avoid processing unrelated files.
Keep the Google Sheet outside the invoice PDF folder to avoid trigger issues.
Step 2 - Set up the n8n to trigger for new PDFs
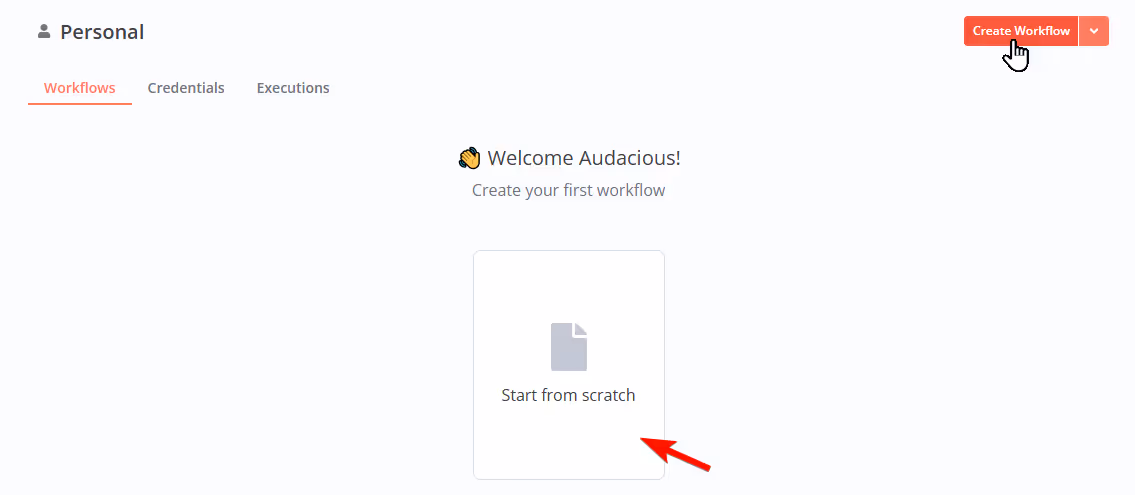
Next, configure n8n to check your Google Drive folder for new PDFs every minute. This frequent polling is great for testing, though you might adjust it later for production use. Open n8n and create a new workflow from scratch.
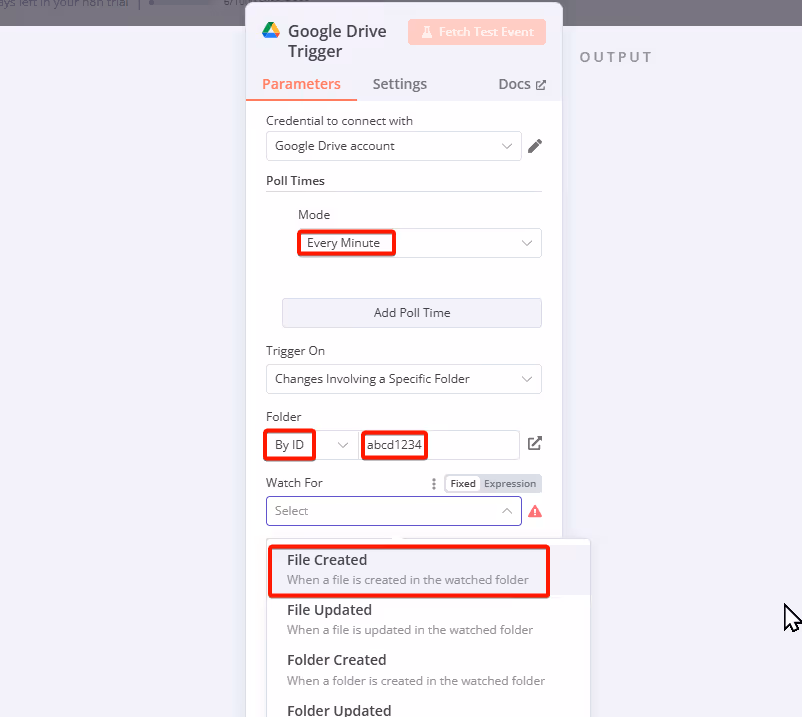
Add a "Google Drive" trigger node "On changes involving a specific folder".

Set it to watch for "File Created" events, change to Folder "By ID", paste the folder ID from Step 1 into the folder field, and set the polling interval to 1 minute.
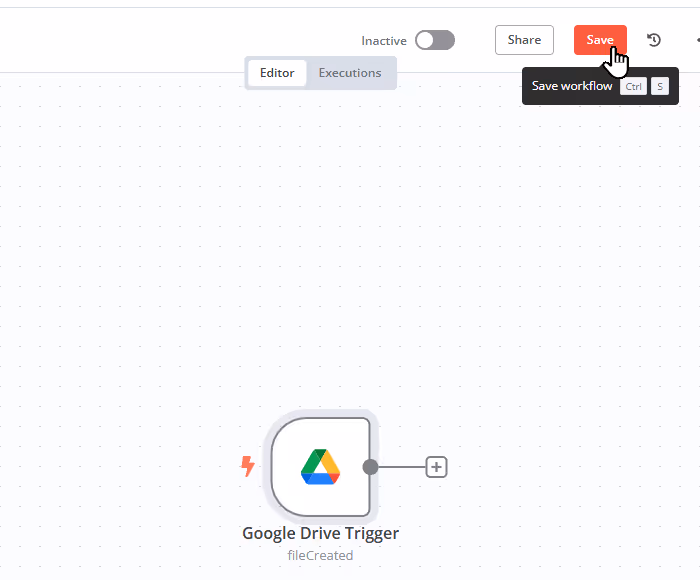
Press "ESC" and save your work.
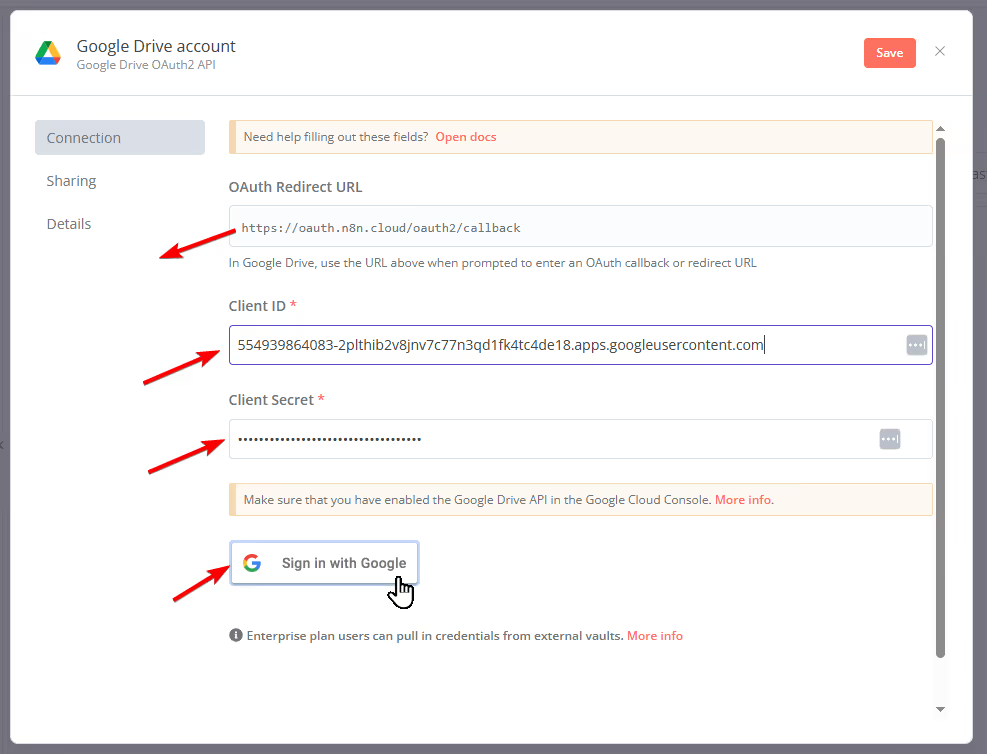
To make this node work, you’ll need to authenticate with Google Drive using OAuth 2.0. In n8n, go to "Credentials", which can also be found in the home menu, and click "Create credential".

On the next screen choose "Google Drive OAuth2 API".

The following steps require you to create Google credentials on Google Cloud Platform (GCP). Step by step instructions for this longer process can be found in the n8n Documentation that includes also a video to follow.
Steps to follow
- Generate and save the credentials received from GCP.
- Link these credentials to the trigger node in n8n.
- Add the OAuth Redirect URL in GCP.
FInally
- Click "Save", then "Sign in with Google".
- On the OAuth consent screen, allow access to your Gmail account.
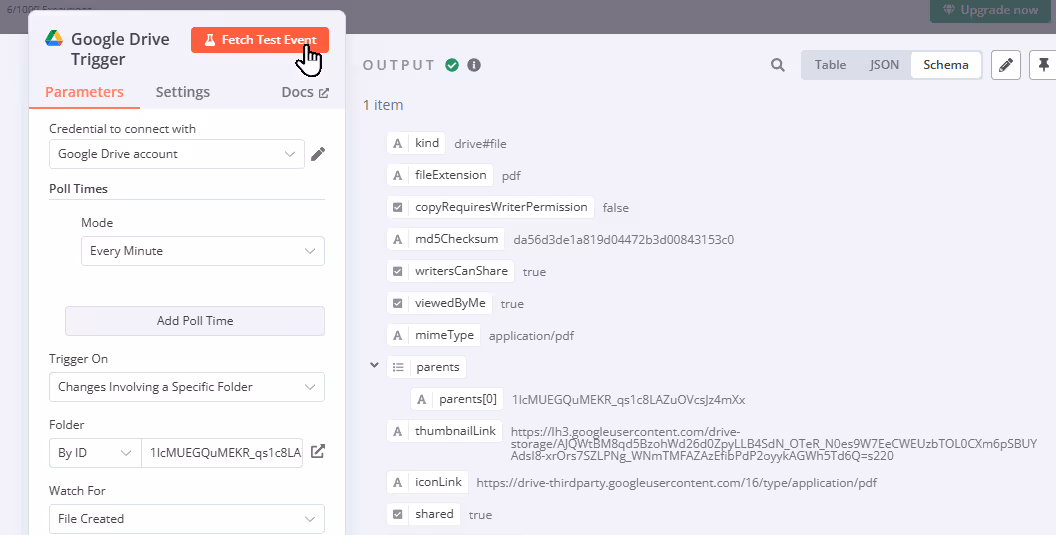
Now upload a PDF into our invoice folder and Click "Fetch Test Event" which should show you something similar to the below screenshot.
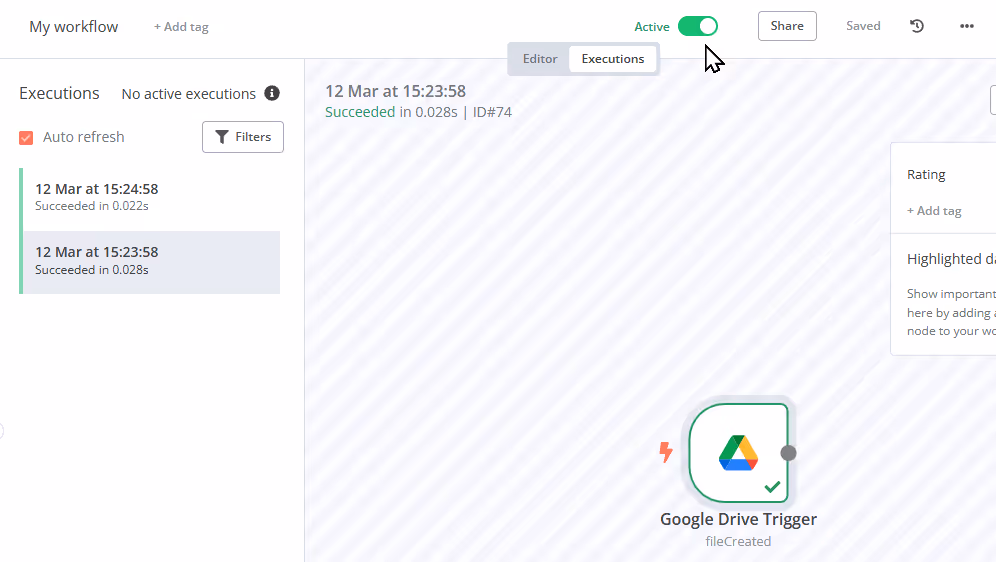
Great! We've now set up a trigger that activates with every uploaded file.
You can also save the workflow, set it to "Active," and monitor new file uploads in the Executions panel on the left.
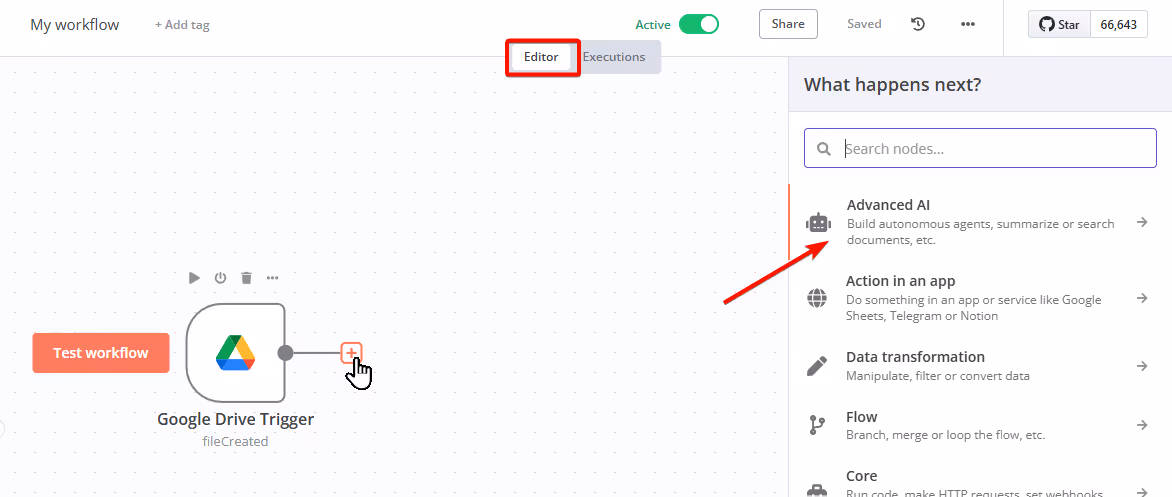
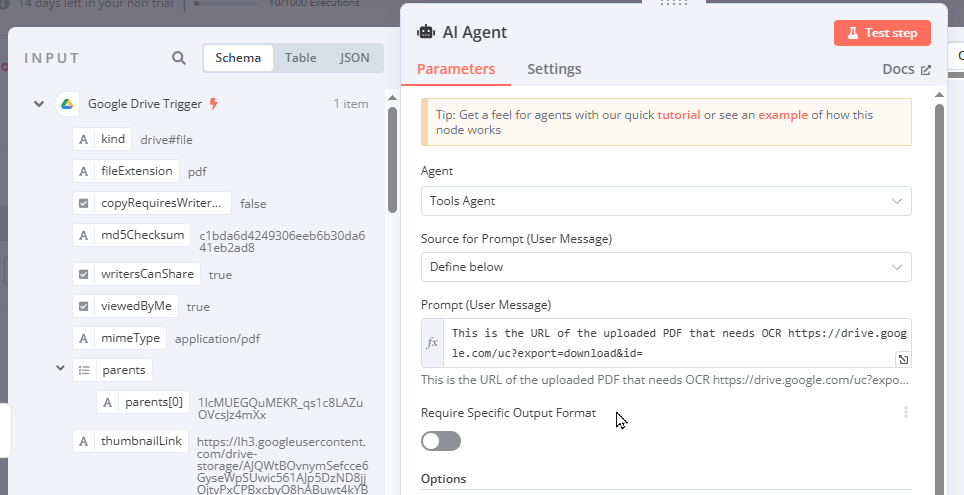
Step 3 - Create an n8n AI Agent
Back in the Editor, add an "Advanced AI" Agent to handle the whole process by clicking on the + sign of our Google Drive Trigger.
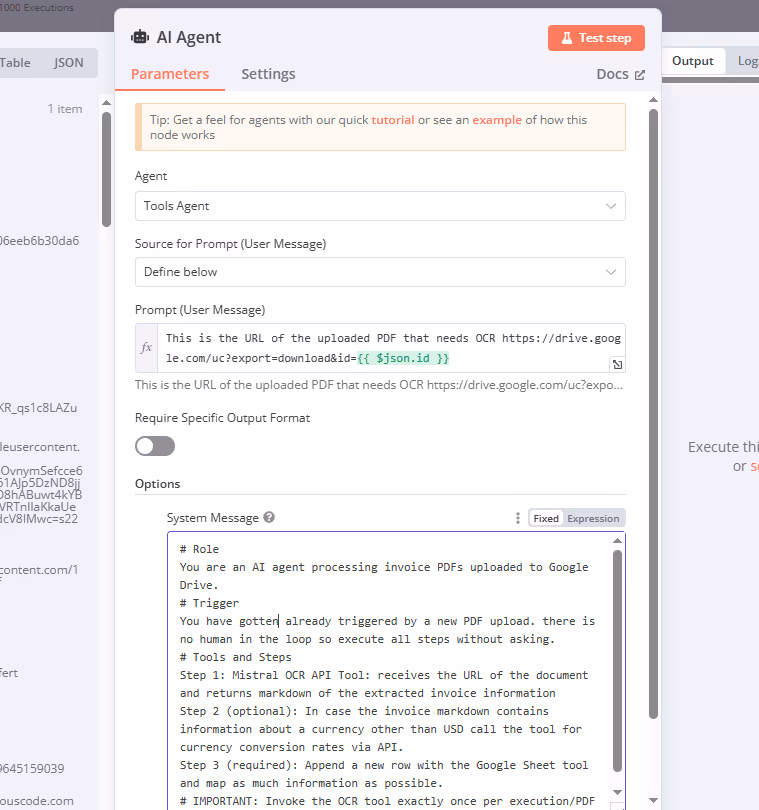
Add a Tool Agent node and use this Prompt (User Messge) to guide it:
This is the URL of the uploaded PDF that needs OCR https://drive.google.com/uc?export=download&id={{ $json.id }}.
The expression field can be pulled from the INPUT Schema from our Google Drive node.
Step 4 - Large Language Model (LLM) and memory considerations
Now we need to add the "brains" to our AI Agent - a LLM. Click on the + sign to add a Chat Model (LLM) to our AI Agent.

Choose "OpenAI" as the Chat Model provider for the Agent and select the "4o-mini" model. Add your OpenAI credentials by using an API key created on their platform.
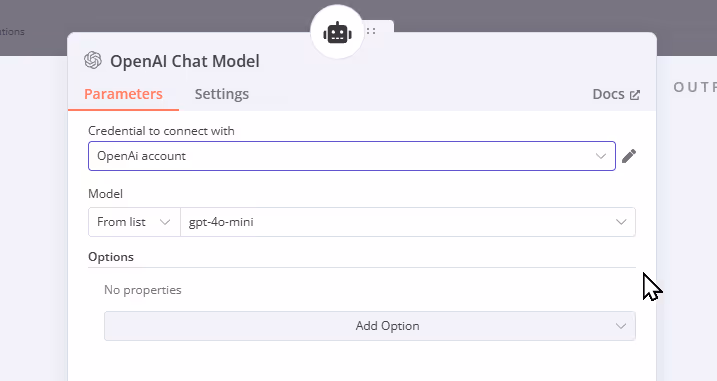
The GPT 4o-mini model is smart enough for our task, fast, and cost-effective.
Since we're processing each invoice independently without a conversational context, there’s no need to enable memory like a window buffer—just leave it off. During a single execution that in our case will involve multiple tool requests, the AI agent maintains an internal context to manage these interactions effectively.
Step 5 - Obtain a Mistral API key
To use Mistral OCR, you’ll need an API key from Mistral AI. Mistral OCR is a cutting-edge tool that excels at extracting text from complex documents, including invoices with varied layouts or even handwritten notes. It’s natively multilingual and handles tables, images, and advanced formatting better than traditional OCR solutions, making it ideal for our diverse invoice formats.
Head to https://mistral.ai/ and register for an account. Once logged in, go to the API Keys section in your dashboard and generate an API key.

Copy it securely—you’ll use it in the next step.
Step 6 - Create the Mistral OCR tool in n8n
Let’s give the AI Agent a HTTP Request Tool to extract text from PDFs.

Rename the node "HTTP Request Mistral OCR". Set its description to: "Extract text from a PDF document. Requires the document URL".
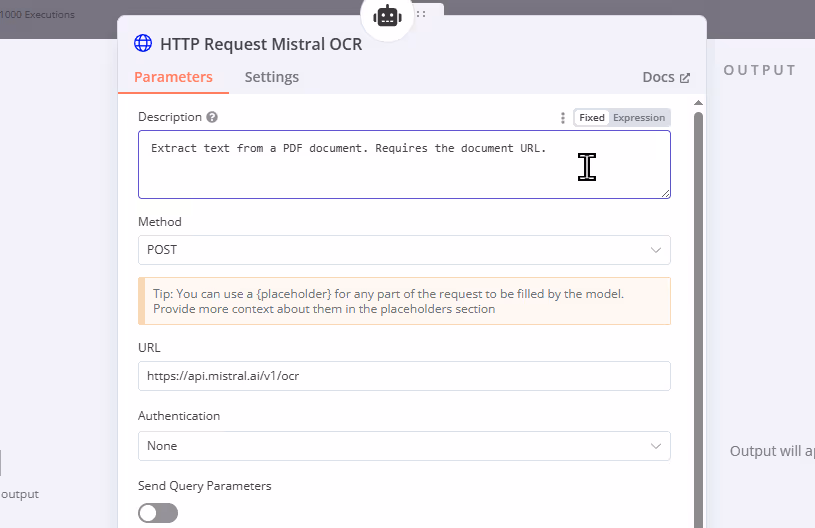
Configure the HTTP Request with these settings:
Method: POST
URL: https://api.mistral.ai/v1/ocr
Headers:
- Authorization: Bearer <Mistral_API_key> (replace <Mistral_API_key> with your key)
- Content-Type: application/json
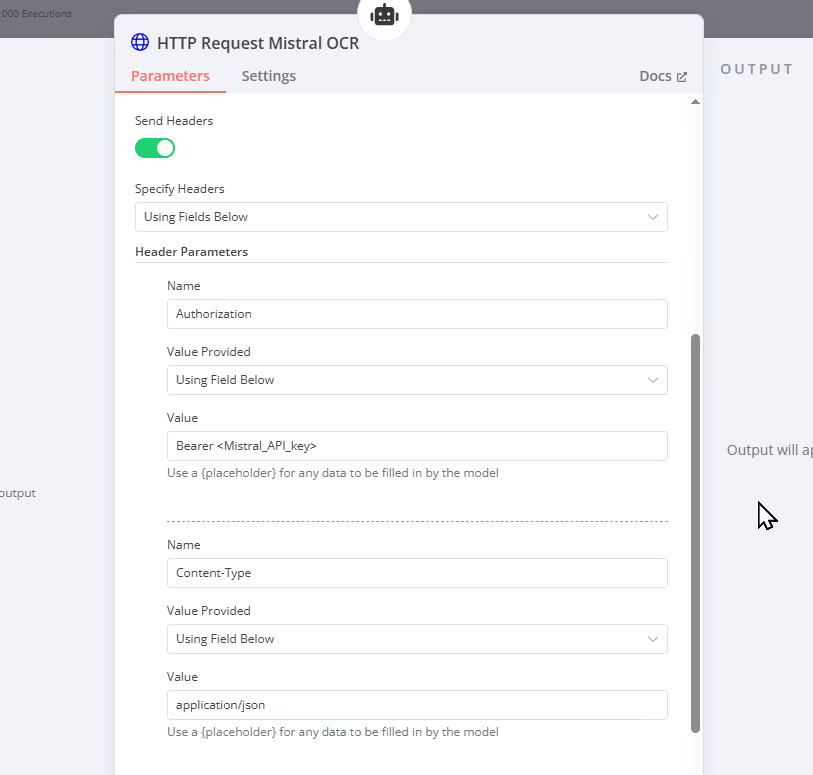
Add the following JSON Expression:
{
  "model": "mistral-ocr-latest",
  "document": {
    "type": "document_url",
    "document_url": "{{params.document_url}}"
  },
  "include_image_base64": false
}
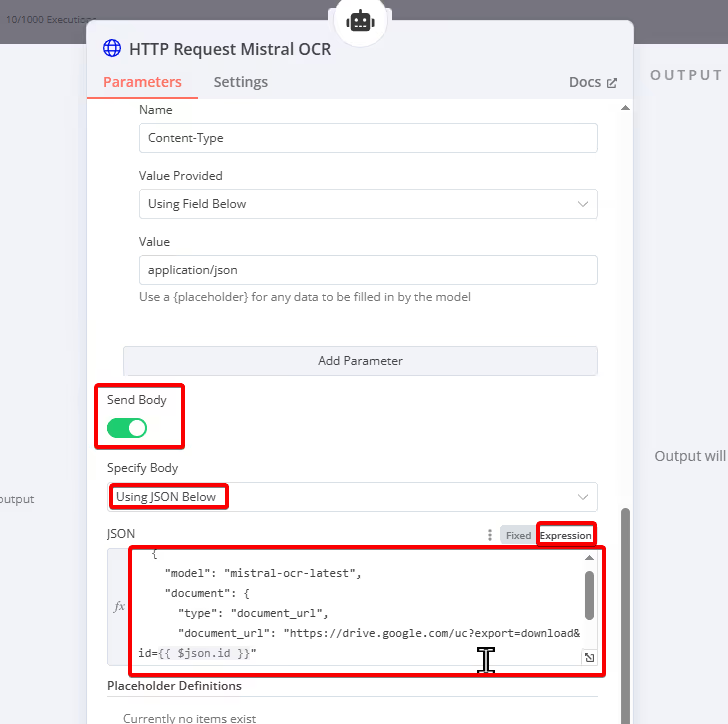
Setting "include_image_base64" to false ensures we only get text, not image data, keeping the output lean. The OCR result might look a bit messy—random line breaks or mixed formatting—but that’s okay.
The AI Agent’s strength lies in parsing this raw output with the LLM to find key invoice details, which is a big advantage when dealing with varied or handwritten invoices.
Safety Consideration
For simplicity, we added the API key to the header right inside the node. To have the API key hidden from workflow exports we recommend creating Credentials for each API call from the Overview > Credentials page. Choose "New Credential", select "Header Auth" and then add name and value.
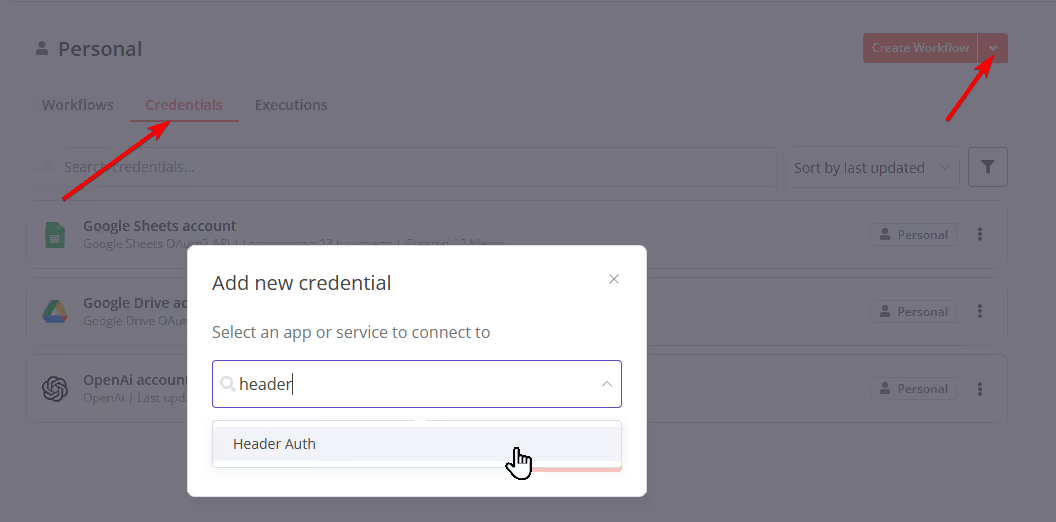

Back in your node select Authentification > Generic Credential Type > Header Auth and select your previously created credential.

Step 7 - Add currency conversion with CurrencyFreaks
If an invoice isn’t in USD, we’ll let the AI Agent convert it using the CurrencyFreaks API.
Sign up at https://currencyfreaks.com/ to get a free API key.

The agent will call this tool only if the invoice currency is not USD, fetch the exchange rates of today, and handle the conversion math itself. Some AI models struggle with math, so try adding the n8n calculator tool if currency conversions fail.
In the AI Agent node, add another HTTP Request tool named "Currency Conversion Rates", and set its description to: "Get the latest exchange rate for a given currency to USD."
Configure it as an HTTP Request:
Method: GET
URL: https://api.currencyfreaks.com/v2.0/rates/latest
Send Query Parameters:
- Name: "apikey"
- Value: <currency_api_key> replace this with the API you received from CurrencyFreaks
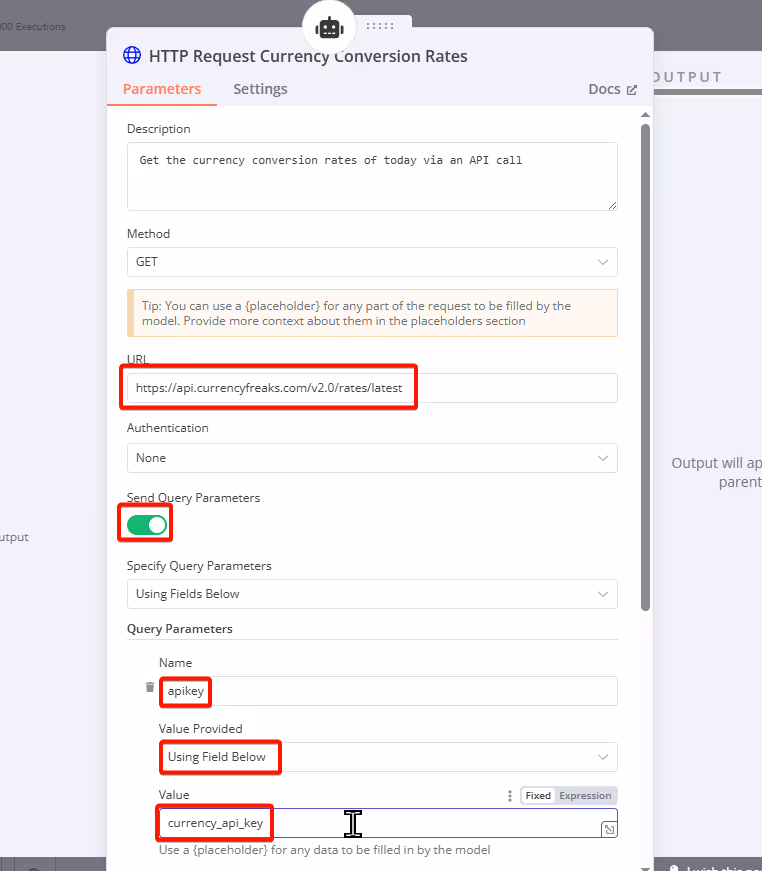
That’s it for the second API call.
If you want to make your AI agent even smarter, consider tweaking its system prompt to factor in the invoice’s country or address. Some currencies outside the U.S. also use the “$” sign, which can lead to misclassification. By instructing the agent to check for location clues—like an address in Singapore—it can automatically recognize the currency as Singaporean dollars and trigger the correct conversion to USD. This small adjustment can take your automation from good to superhuman!
Step 8 - Log invoice data to Google Sheets
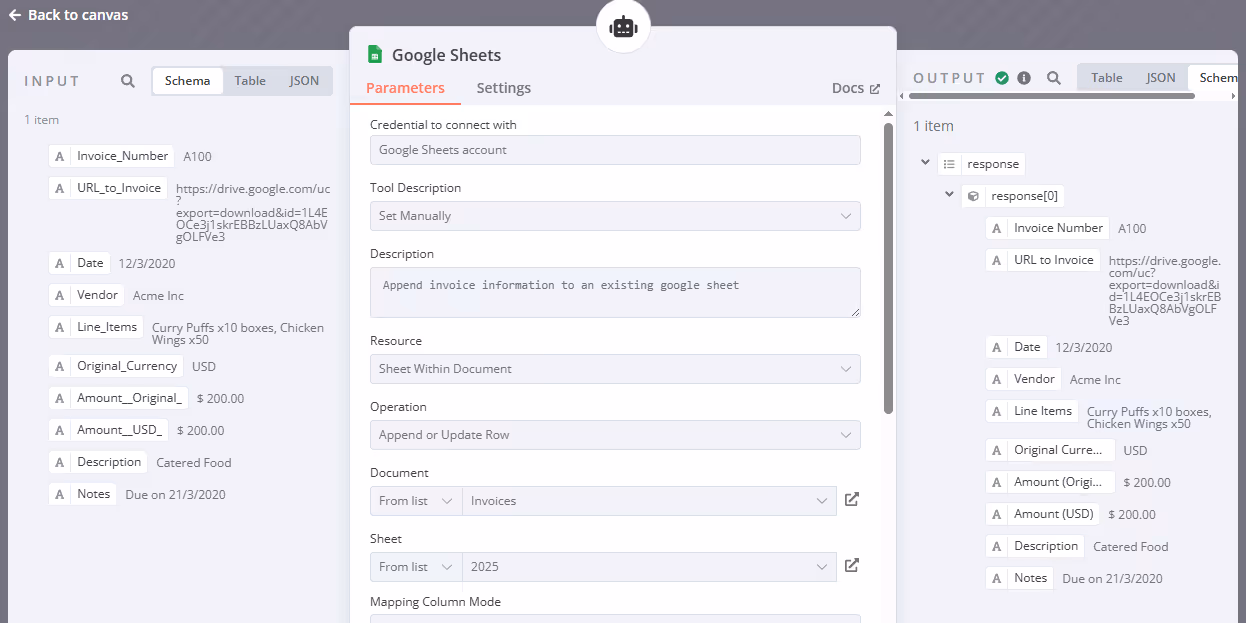
Next we will be adding a Google Sheets Tool to add the invoice information into our invoice sheet. First change the Tool Description to "Set Manually", enter "Append invoice information to an existing google sheet", and set Operation to "Append or Update Row". Choose the correct Document and Sheet for our invoice sheet. Since the result from the OCR might use different names, we let the LLM decide. But we will not choose Mapping Column Mode: Map automatically since this produced in our use case not the desired result. Instead, use "Map Each Column Manually" and we use the URL to Invoice as a unique ID.
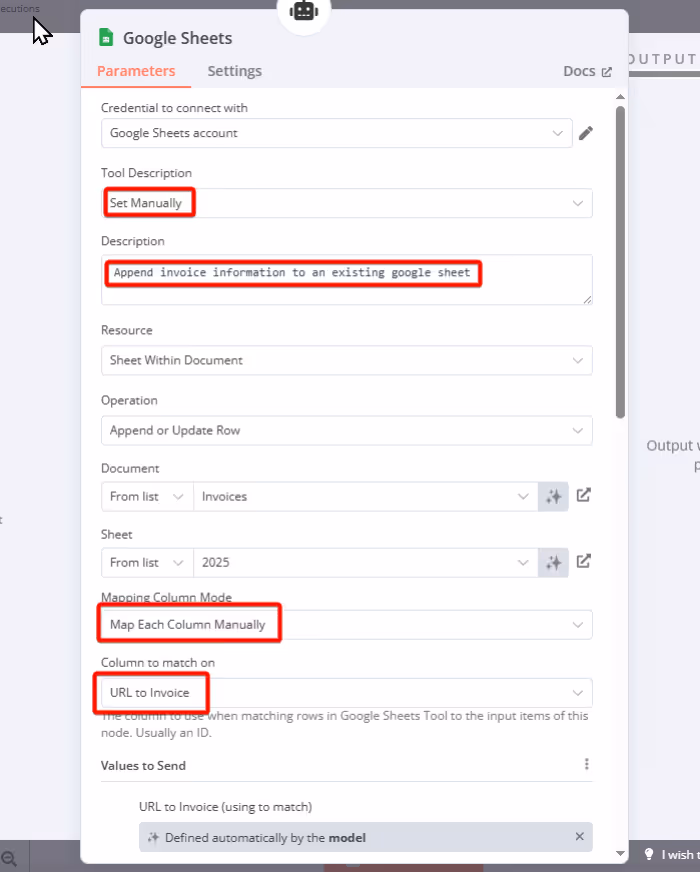
Now we set each column’s value to "Defined automatically by the model" using the AI stars icon.

This lets the agent flexibly map invoice fields to columns, even if invoice formats differ. Sometimes Google Sheets might need additional scopes added in GCP for read and write access.
Step 9 - Define the AI Agent’s task
Tell the AI Agent what to do with a clear system message. In the AI Agent node, set the prompt to:
# Role
You are an AI agent processing invoice PDFs uploaded to Google Drive.
# Trigger
You have been triggered by a new PDF upload. There is no human in the loop, so execute all steps without asking.
# Tools and Steps
**Step 1:** Mistral OCR API Tool
- Receives the URL of the document and returns markdown of the extracted invoice information.
**Step 2 (optional):** Currency Conversion API Tool
- If the invoice markdown contains information about a currency other than USD, call the tool for currency conversion rates via API.
**Step 3 (required):** Google Sheets Tool
- Append a new row with the Google Sheet tool and map as much information as possible.
# IMPORTANT
Invoke the OCR tool exactly once per execution/PDF upload.
Writing prompts in Markdown format helps structure them properly and improves AI comprehension.
Troubleshoot the AI Agent
If you encounter errors or incorrect results it helps to dig into the Executions by double-clicking any node.

Seeing the INPUT and OUTPUT helps to fix issues. Here is an example of the Google Sheets tool.
Common issues might be: an incorrect folder ID in the Google Drive trigger, authentication problems with Google Drive or Sheets, invalid API keys for Mistral or CurrencyFreaks, or the agent using the tools incorrectly.
To test the APIs separately, you can use Postman or other tools.
For Mistral OCR API:
curl -X POST https://api.mistral.ai/v1/ocr \
-H "Authorization: Bearer <Mistral_API_key>" \
-H "Content-Type: application/json" \
-d '{
"model": "mistral-ocr-latest",
"document": {
"type": "document_url",
"document_url": "https://drive.google.com/uc?export=download&id=<file_id>"
},
"include_image_base64": false
}'
For CurrencyFreaks API:
curl -X GET "https://api.currencyfreaks.com/v2.0/rates/latest?apikey=<currency_api_key>"
Don’t forget to replace <Mistral_API_key>, <file_id>, and <currency_api_key> with your actual values. For quick OCR testing without Google Drive, try a public PDF like https://arxiv.org/pdf/2201.04234.
Once set up, the workflow runs automatically whenever a new PDF lands in your Google Drive folder.
Testing with a wide variety of PDFs will allow you to showcase the strength of combining powerful OCR with smart AI processing. If edge cases don’t perform well, adjust the system prompt with additional instructions or add an example of input and output.

Challenge the AI Agent further with handwritten notes or poorly scanned or photographed receipts in PDF format. The Mistral API also supports PNG image uploads, although incorporating this would require minor adjustments.
Final Words
You’ve successfully built an automated system that watches a Google Drive folder, extracts invoice details with Mistral OCR, converts currencies if needed, and logs everything into a Google Sheet. A time-saver for anyone working with invoices.
To expand, explore notifying via Slack—check n8n’s Slack node documentation for setup.
Thanks for reading! Keep an eye on the Sheet occasionally—automation is powerful, but financial data deserves a quick human check now and then.


